
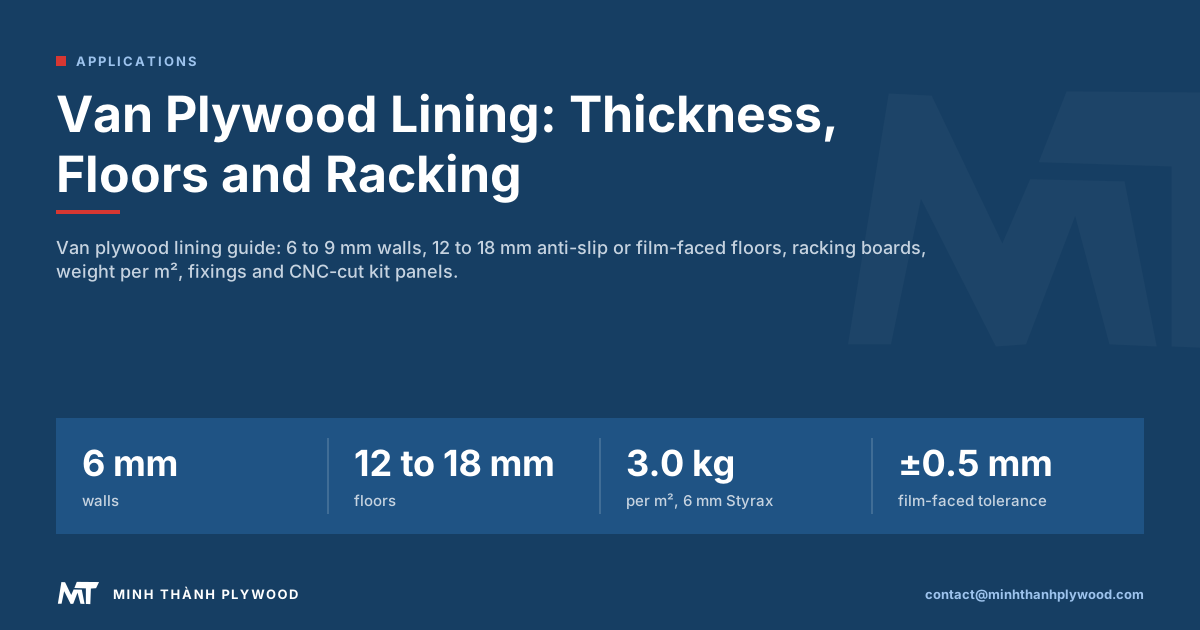
Van plywood lining is usually 6 mm plywood on the walls, 9 mm where shelving or racking is fixed, and a 12 to 18 mm film-faced or anti-slip plywood floor. Light white Styrax cores keep payload loss low; dense eucalyptus faces resist knocks. Minh Thanh Plywood, a Vietnamese plywood manufacturer, supplies the sheets and cut-to-size panels kit makers cut on CNC.
Van plywood lining: what goes where
Van plywood lining puts 6 mm plywood on the side walls and doors, 9 mm where shelves or racking are fixed, and a 12 to 18 mm hard-faced plywood floor. The lining protects the outer steel from dents from inside, gives a flat surface for fixings, and makes the load space easier to clean.
Each part of the van asks something different of the panel:
- Floor: carries loads, trolleys and boots, so it needs thickness, a hard face and a water-resistant bond.
- Side walls: take knocks from tools and materials, so they need a tough face but little thickness.
- Wheel arches: take scuffs at loading height, so they get a box of the same plywood as the floor or the wall.
- Rear and side doors: need a light panel that clears the door mechanism.
- Bulkhead: usually steel from the van maker; plywood is added only for fixing points.
- Racking backboards: need screw holding, so they use 9 to 12 mm plywood.
Weight is the constraint on every choice. A light-commercial van has a fixed payload, and every kilogram of lining is a kilogram less to carry.
What thickness ply do you use for van lining?
Use 6 mm plywood for van side walls, 9 mm where racking is fixed, 12 mm for a light-load floor and 15 to 18 mm for a heavy-load floor. Wall thickness is set by stiffness between the van’s ribs; floor thickness is set by the loads the floor carries.
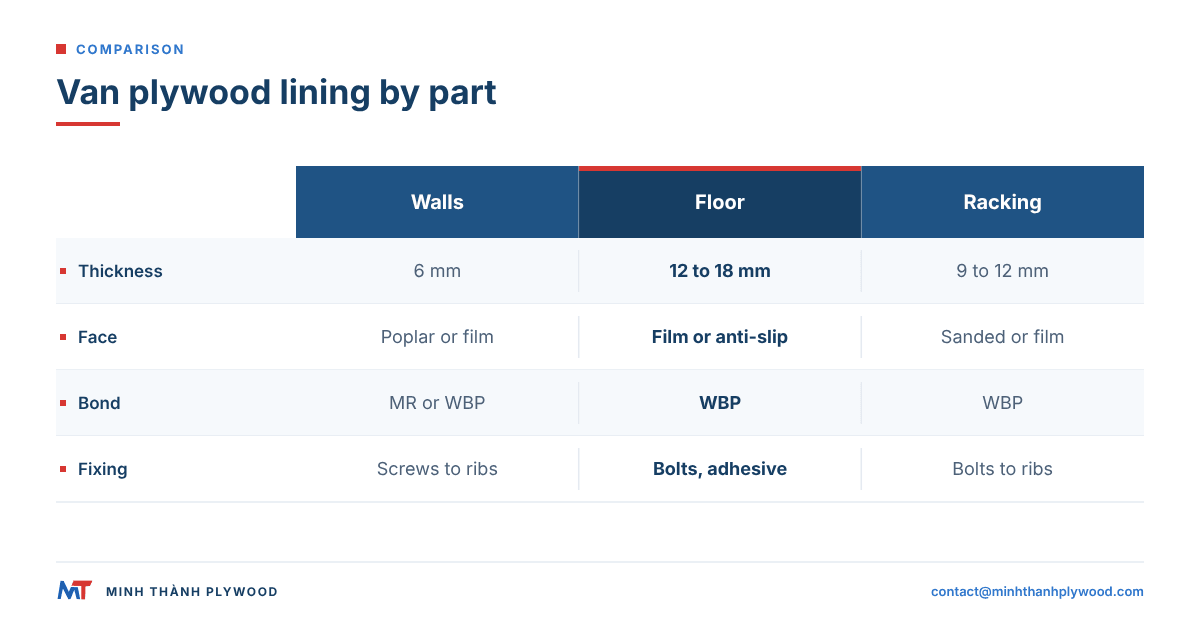
The table gives the thickness and face we would specify for each part of a typical panel van.
| Part | Thickness | Face | Bond | Why |
|---|---|---|---|---|
| Side walls | 6 mm | Poplar, eucalyptus or film | MR or WBP | Light, bends to the van side, takes knocks |
| Walls behind racking | 9 mm | Poplar or eucalyptus | MR or WBP | Holds screws for shelving brackets |
| Doors | 4 to 6 mm | Same as walls | MR or WBP | Clears the door locks and handles |
| Wheel arch boxes | 9 to 12 mm | Film or anti-slip | WBP | Takes scuffs and wet boots |
| Floor, light loads | 12 mm | Film or anti-slip | WBP | Carries tools, boxes and trolleys |
| Floor, heavy loads | 15 to 18 mm | Anti-slip mesh | WBP | Carries pallets, pallet trucks and heavy kit |
| Racking backboard | 12 mm | Sanded or film | WBP | Thicker screw hold for heavy shelving |
Two rules sit behind the table. A thinner wall bends with the van body and does not rattle; a thicker wall only adds weight. And any panel that will get wet, at the floor, arches and doors, needs a phenolic (WBP) bond rather than a urea glue.
Our thickness range runs from 3 to 40 mm, in 1220 × 2440 mm and 1250 × 2500 mm sheets. Commercial and film-faced panels are pressed to ±0.5 mm thickness tolerance, which keeps adjacent floor sheets level at the joint.
Plywood van floor: film-faced or anti-slip?
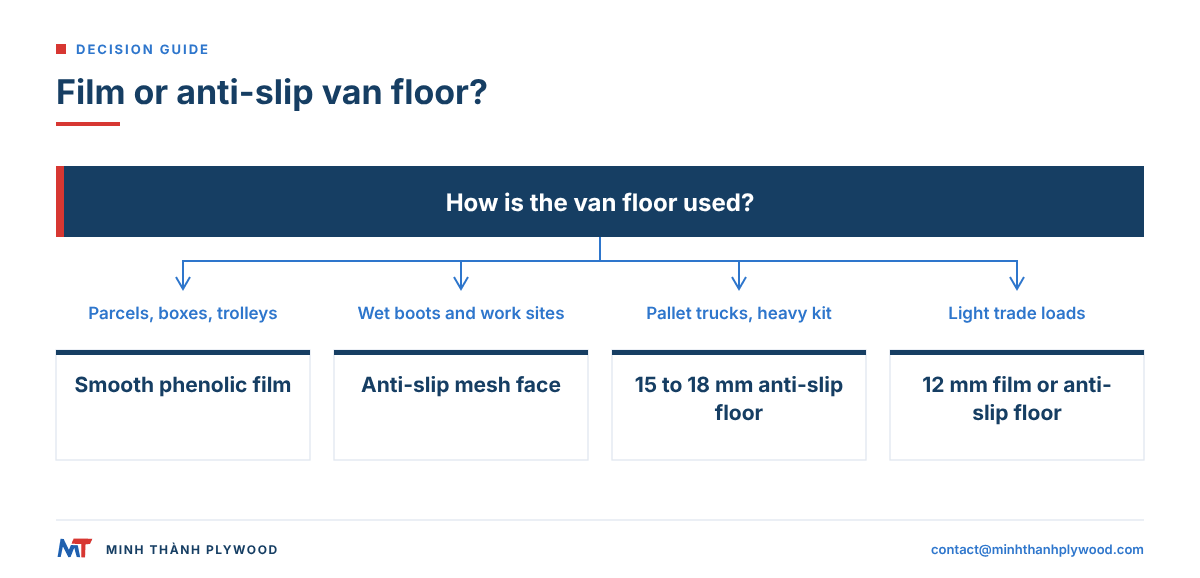
A plywood van floor should be 12 to 18 mm thick with a phenolic film face for easy cleaning or an anti-slip mesh face for grip. Both faces are phenolic-impregnated paper pressed onto the plywood; the anti-slip face adds a pressed hexagonal or wire mesh pattern.
How to choose the van flooring plywood:
- Smooth film face: goods slide in and out easily, the floor wipes clean, and water runs off. Best for parcel vans, boxes and trolleys.
- Anti-slip mesh face: boots grip in rain and mud, and loads move less in transit. Best for builders, landscapers and vans driven onto wet sites.
- Two faces: many fitters use an anti-slip face on top and a smooth film on the underside, so the bottom face resists damp from the van floor.
Thickness follows the load. A 12 mm floor is enough for most courier and trade vans. Fleets that run pallet trucks inside the van, or carry engine parts and stone, choose 15 or 18 mm.
Our film-faced plywood is made with phenolic bonds for wet use, and anti-slip plywood is pressed on order for floors and ramps.
Which core and face keep the lining light?
The core sets the weight of a van lining, and the face sets how well it takes knocks. A white Styrax core is the lightest we press; a eucalyptus core is heavier, harder and holds screws better.
Our reference densities show the spread. White Styrax core plywood is about 500 kg/m³, Acacia about 580 kg/m³ and Eucalyptus about 650 kg/m³. Weight per square metre follows from density × thickness:
| Thickness | Styrax core, per m² | Eucalyptus core, per m² | Styrax, per 1220 × 2440 mm sheet | Eucalyptus, per sheet |
|---|---|---|---|---|
| 6 mm | 3.0 kg | 3.9 kg | 8.9 kg | 11.6 kg |
| 9 mm | 4.5 kg | 5.9 kg | 13.4 kg | 17.4 kg |
| 12 mm | 6.0 kg | 7.8 kg | 17.9 kg | 23.2 kg |
| 18 mm | 9.0 kg | 11.7 kg | 26.8 kg | 34.8 kg |
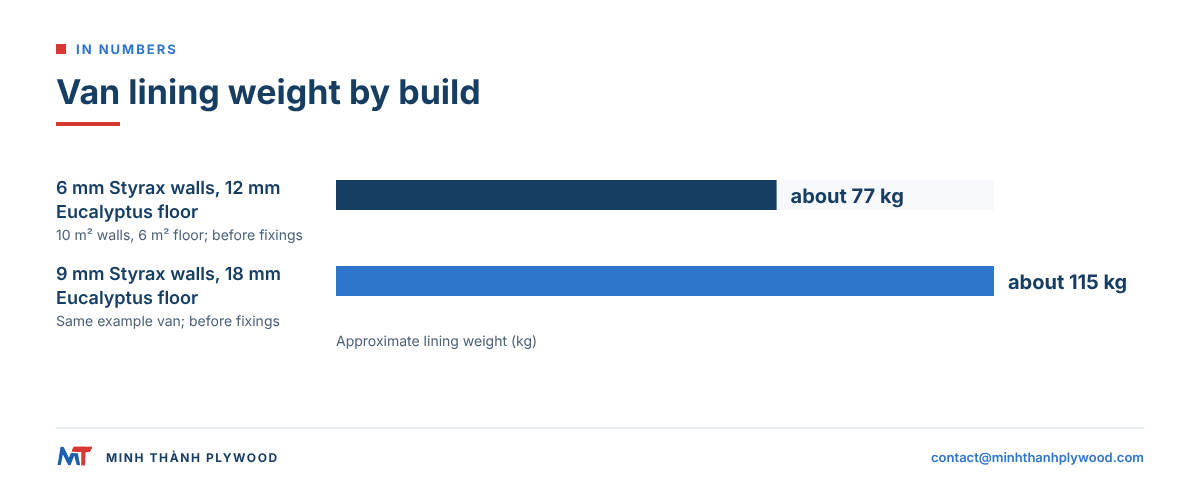
A worked example: a medium van with about 6 m² of floor and 10 m² of wall. Lined with 6 mm Styrax walls and a 12 mm Eucalyptus floor, the lining weighs about 30 kg plus 46.8 kg, roughly 77 kg before fixings. The same van in 9 mm Styrax walls and an 18 mm Eucalyptus floor weighs about 115 kg. For a payload-limited van, the lighter lining is worth the difference. Payload matters most on vans near the maximum authorised mass that a category B car licence covers, per GOV.UK driving licence categories.
Faces for walls: poplar and EV (engineered veneer) faces are light and smooth; eucalyptus faces are harder and resist dents. Poplar plywood with a Styrax core is the lightest wall panel we make.
How to ply line a van, step by step
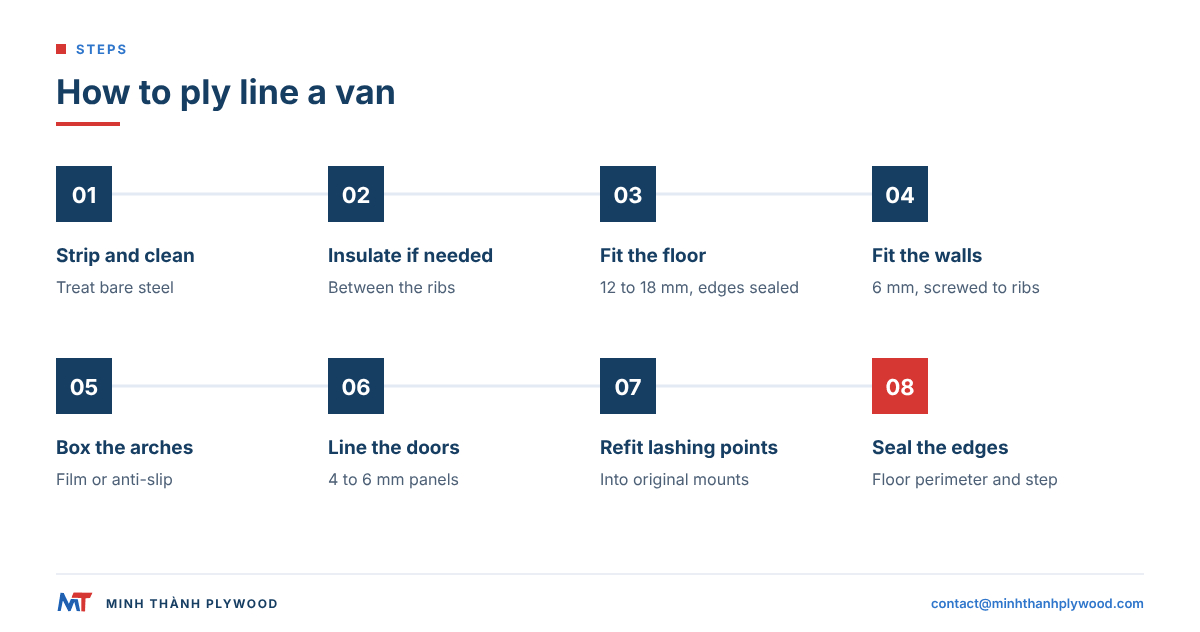
To ply line a van, empty the load space, make templates of each wall and door panel, cut the plywood, fit the floor first, then the walls, arches and doors. A careful first-time fit of a medium van takes a day; a pre-cut kit takes a few hours.
- Strip and clean. Remove the old floor, load lashing points that will be refitted, and any rust. Treat bare steel before you close it in.
- Insulate if needed. Add insulation between the ribs now if the van will carry people or temperature-sensitive goods (see below).
- Template the floor. Lay cardboard or hardboard on the floor, trace round wheel arches and door steps, and mark the lashing-point positions.
- Cut and fit the floor. Cut the floor plywood, seal every cut edge, bed it on a few beads of flexible polyurethane adhesive, and bolt it through the existing floor fixing points.
- Template the walls. Hold card against each wall between the ribs, mark the rib lines, the window or vent openings and the lashing points.
- Cut and fit the walls. Cut 6 mm panels to the templates, drill pilot holes over the ribs, and screw each panel to the ribs only.
- Box the wheel arches. Cut a top and two sides, or buy pre-formed covers, and fix them to the floor and the walls.
- Line the doors. Cut thin panels to clear the locks, handles and check straps, and fix them to the door frame ribs.
- Refit lashing points. Put back the load rails and rings through the lining into the original mounting points.
- Seal and finish. Run a bead of sealant along the floor edges and at the rear step, so water cannot get under the floor.
Measure twice at the wheel arches: they are the part most often cut wrong.
How to plyline a van with fixings that hold
To plyline a van securely, screw the walls into the steel ribs, bolt the floor through the original floor points, and never drill into the outer skin. The fixing, more than the panel, decides whether a lining rattles.
| Fixing | Where | Notes |
|---|---|---|
| Self-drilling screws with flat heads | Walls to steel ribs | Length passes the ply and grips the rib, without reaching the outer skin |
| Cup washers | Under screw heads on 6 mm walls | Spread the load so the head does not pull through |
| Rivnuts (rivet nuts) | Walls where panels come off for service | Threaded insert in the rib, panel held by machine screws |
| Well nuts | Thin skins without ribs behind | Rubber expands behind the hole; used sparingly |
| Countersunk bolts with large washers | Floor through original fixing points | Keep the floor tight and the bolt heads flush |
| Flexible polyurethane adhesive | Under the floor, on ribs | Stops squeaks; do not glue walls to the outer skin |
A practical rule for screw length: ply thickness plus the rib’s steel and a few threads past it. On a 6 mm wall that is usually a 16 to 19 mm screw. Check the cavity depth behind the rib before you choose.
Avoid the outer skin completely. A screw tip that touches the outer panel can show as a dimple from outside and starts rust under the paint.
Do you insulate before lining?
Insulate before lining when the van will carry people, food or goods that must stay cool or warm; skip it for a plain tool and materials van. The lining closes the cavity, so it is the last chance to add insulation without stripping the walls again.
Common insulation layers behind van plywood lining:
- Closed-cell foam boards between the ribs, glued to the outer skin.
- Mineral or synthetic wool in the cavities, held by the lining.
- A vapour control layer on the warm side when the van is used as a camper or welfare van.
Leave drainage paths at the bottom of each wall cavity open. Moisture collects behind linings in winter, and a blocked drain rusts the sill. A plywood for campervan conversions build adds furniture and a ceiling on top of this layer.
Van racking plywood: backboards and shelves
Van racking plywood is 9 to 12 mm plywood fixed to the ribs where shelving, tool racks or bin units are bolted, so the brackets have something solid to grip. It also stops racking bolts from pulling through thin wall panels under braking.
Where racking plywood goes:
- Racking backboards: a full-height panel behind the shelving, through-bolted to the ribs.
- Shelves: 12 to 18 mm plywood on steel or aluminium frames, often with a film face so oil and water wipe off.
- Drawer bases and dividers: 9 to 12 mm, cut to the drawer unit.
- Bin and parts walls: 9 mm panels with louvre strips screwed on.
Bolt racking through the lining into the ribs or factory fixing points, not into the plywood alone. The plywood spreads the load; the steel holds it.
CNC-cut ply lining kits or full sheets?
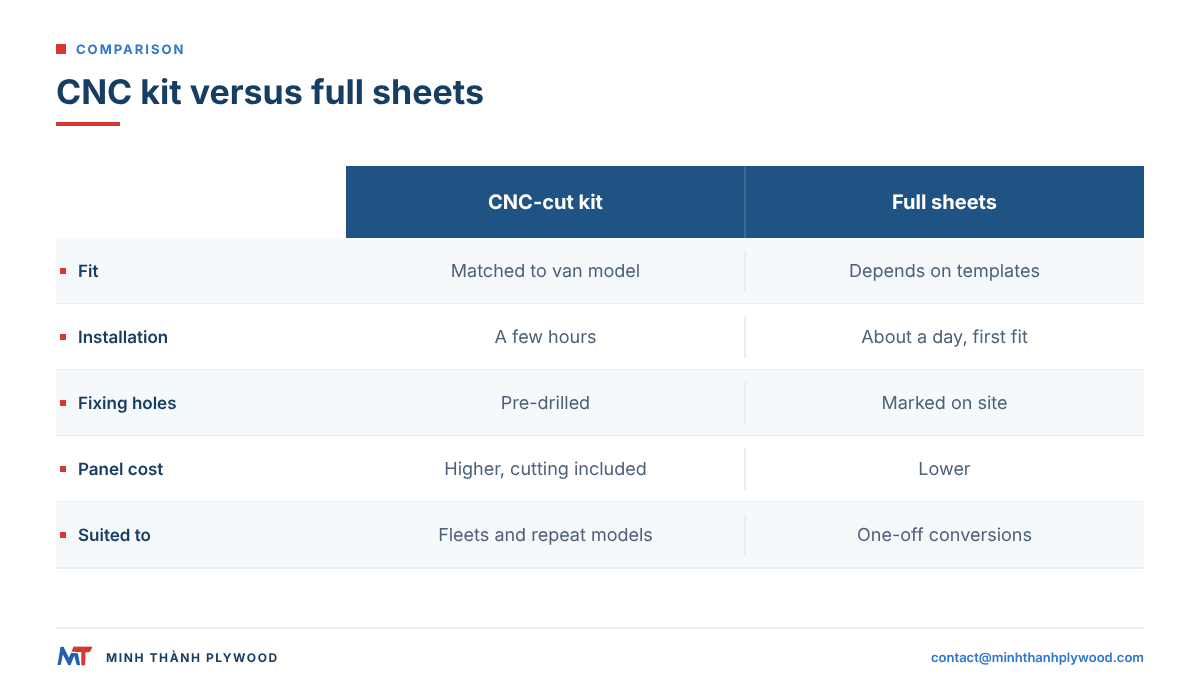
A CNC-cut ply lining kit fits the van’s shape exactly and goes in within a few hours; lining from full sheets costs less in panels and more in time and offcuts. For fleets and professional fitters, a kit pays back in labour; for a one-off van, full sheets are fine.
| Point | CNC-cut kit | Full sheets, cut on site |
|---|---|---|
| Fit | Matched to the van model’s pressings | Depends on templates and the fitter’s skill |
| Fitting time | Hours | About a day for a first fit |
| Fixing holes | Pre-drilled over ribs and lashing points | Marked and drilled on site |
| Waste | Nested on the sheet at the kit maker | Offcuts at the van |
| Panel cost | Higher, includes cutting | Lower |
| Best for | Fleets, dealers, repeat van models | One-off vans, odd conversions |
UK ply lining kit prices against DIY sheets (October 2026)
UK kit makers sell full ply lining kits by van model, and the prices set the bar for a sheet buyer:
| Kit maker | Examples | Price before VAT | Spec |
|---|---|---|---|
| Vanax | 179 kits by model and year, for example L1 H1 and L2 H1, Compact, M and XL models | £143 to £315 | 5.5 mm walls and doors, 12 mm floor and wheel boxes |
| Plyline | Transit Custom 2023 L1H1 and L2H1; Iveco Daily MWB 3600 mm load length | £253 to £495 (Transit Custom); £336 to £649 (Iveco Daily) | 6 mm side panels |
| Plycraft | 73 kits across 30 van models, including Berlingo, Transit Custom, Sprinter, Vito, ID Buzz and Kia PV5 | Per kit | Fitment list by model |
Small and medium vans sit at about £140 to £320 and Transit Custom or Iveco Daily class vans at about £250 to £650. The DIY sheet route costs less in material. A 12 mm hardwood plywood sheet of 1220 × 2440 mm is about £19 to £28 including VAT and a 6 mm poplar-core sheet about £13 to £18 including VAT (London Building Supplies). For a Transit Custom L1 that is three 6 mm and two 12 mm sheets: about £77 to £110 including VAT, or £64 to £92 before VAT, and it costs a day of cutting.
How many 1220 × 2440 mm sheets a van takes, from the floor and both full-height side walls plus 15% waste:
| Van (load space, mm) | 6 mm wall sheets | 12 mm floor sheets | Total |
|---|---|---|---|
| Ford Transit Custom L1H1 (2602 × 1777 × 1267) | 3 | 2 | 5 |
| Ford Transit Custom L2H1 (3002 × 1777 × 1267) | 3 | 3 | 6 |
| Vauxhall Vivaro L1 (2512 × 1636 × 1397) | 3 | 2 | 5 |
| Renault Trafic (2537 × 1662 × 1387) | 3 | 2 | 5 |
| Mercedes Sprinter L2H2 (3397 × 1787 × 2009) | 6 | 3 | 9 |
These are planning estimates from published load-space sizes (Transit Custom, Sprinter, Vivaro, Trafic); a kit maker nests the real pressings and wastes less. The common kit spec is 5.5 to 6 mm walls and doors with a 12 mm floor. For the CNC-cut route, we supply kit makers with 1220 × 2440 mm sheets of even thickness.
Kit makers cut from standard 1220 × 2440 mm or 1250 × 2500 mm sheets, nested to waste as little as possible. A kit maker who cuts the same van model every week gains from panels that are the same thickness and flatness in every delivery, because the CNC program and the fixing positions stay the same.
Cut-to-size panels for kit makers
Kit makers and van fitters can buy plywood already cut to their nesting size, so less waste and handling stays in their workshop. At Minh Thanh, one sheet can be cut into 4, 6 or 8 pieces before packing, and we ship cut-to-size panels regularly to Italy and other European markets.
What a kit maker can order from us:
- Thickness: 6, 9, 12 and 18 mm are the usual van lining set; our range is 3 to 40 mm.
- Sheet size: 1220 × 2440 mm, 1250 × 2500 mm, or custom sizes such as 1220 × 2500 mm.
- Cut-to-size: blanks for the CNC, see cut-to-size plywood.
- Faces: poplar, EV, eucalyptus or film; anti-slip for floors.
- Core: white Styrax for light walls, Eucalyptus for floors and racking boards.
- Tolerance: ±0.5 mm on commercial and film-faced panels, ±2 mm on length and width.
Panels are dried to 8–12 % moisture content at dispatch, the normal range for plywood, so they stay flat once acclimatised in the workshop.
Moisture, condensation and edge sealing
Van linings fail at the edges and the floor first, because water from boots, rain and condensation soaks into cut plies. Sealing every cut edge, and leaving the wall cavity able to drain, stops most of that damage.
- Seal cut edges of floor and arch panels with paint, edge sealer or the floor adhesive.
- Seal the floor perimeter with flexible sealant so water from the rear step cannot run under the floor.
- Use a phenolic bond for floors, arches and doors; urea glue is for dry interiors.
- Ventilate a lined van that carries wet gear, so condensation dries between jobs.
- Repair damaged film quickly with paint or a patch before water gets into the core.
For deeper damage, see our guide to repairing plywood.
Emissions inside a closed van
A van load space is a small, closed volume, so low-emission plywood matters when people work inside it or the van is converted to a camper. Furniture and interior panels from our mill use UF glue at E0 emission, and our mill holds CARB P2 / TSCA Title VI certification (ICTT mill no. 23024).
Six chamber tests to ASTM D6007 were carried out between April 2025 and June 2026 by Shanghai Hongjun and ICTT Vietnam on 9, 15 and 18 mm panels. They averaged 0.014–0.032 ppm. The limit for veneer-core hardwood plywood is 0.05 ppm under 40 CFR 770.10.
For floors and arches, a phenolic (WBP) bond is the right choice for water. The use classes in BS EN 636 cover dry, humid or exterior conditions. Bond and emission class are two separate specifications, so write both on the order: the bond for each panel type, and the emission class for the interior panels.
What to check when lining panels arrive
Check a delivery of van lining plywood for thickness, flatness, face and bond before the first van is lined. A short check at the workshop catches a wrong thickness before it reaches a CNC program.
- Thickness: measure several sheets with a caliper at the corners and the middle.
- Size and square: check length, width and diagonals against the order.
- Face: look for open joints, patches and film damage on the visible face.
- Bond: ask for the bond type on the label and the documents.
- Moisture: check that sheets are dry and flat after a day in the workshop.
- Edges: look for voids in the core at the edges of cut panels.
Every shipment from our mill is photographed and filmed before loading, and buyers receive the photos and the video.
What to write on a van lining plywood order
A van lining plywood order lists each panel type on one line: use, thickness, face, core, bond and quantity. A kit maker or fleet buyer can copy this layout.
- Use: walls, floor, arches, doors or racking.
- Thickness: for example 6 mm walls, 9 mm racking, 12 mm or 18 mm floor.
- Size: 1220 × 2440 mm, 1250 × 2500 mm, or cut-to-size blanks.
- Face: poplar, EV, eucalyptus, film or anti-slip mesh.
- Core: white Styrax for weight, Eucalyptus for screw holding.
- Bond and emission: WBP for floors and arches; UF glue at E0 emission for dry interior panels.
- Packing and quantity: sheets per pack and the number of 40HC containers, with the destination port.
Our minimum order is one 40HC, with mixed specifications by agreement; production takes 15–45 days after deposit. Free samples let you test the weight and the fit in your van first. Send your panel list to contact@minhthanhplywood.com and we reply within hours.
Buyer questions, answered
What thickness ply for van lining?
Use 6 mm plywood for the side walls and doors, 9 mm where you will screw shelving or racking, and 12 to 18 mm for the floor. Thicker walls add weight without adding much protection.
What size ply for van lining?
Lining kits and DIY linings are cut from standard 1220 × 2440 mm sheets, or 1250 × 2500 mm sheets where a longer wall panel saves a joint. Kit makers cut each wall and door piece to the van's pressed panel shape.
What plywood is best for a van floor?
A 12 to 18 mm phenolic-bonded plywood with a film or anti-slip face. The film sheds water and oil, the mesh face grips boots, and the phenolic (WBP) bond holds when the floor gets wet.
What size screws for ply lining a van?
Short self-tapping or self-drilling screws, long enough to pass the ply and grip the steel rib, with a large flat head or a cup washer. On a 6 mm wall that usually means a screw around 16 to 19 mm long, and never a screw that reaches the outer skin.
Do you need to insulate before ply lining a van?
Insulate first if the van will carry people, food or temperature-sensitive goods, because the lining closes off the wall cavity. A working van for tools and materials is often lined without insulation.
Should van ply lining be glued or screwed?
Wall panels are screwed to the ribs; a bead of flexible polyurethane adhesive under the floor stops squeaks. Do not glue wall panels to the outer skin, because the skin must flex.
Is a CNC-cut ply lining kit worth it?
For a fleet or a professional fit, yes: every piece fits the van's shape, holes line up with the fixing points, and fitting takes hours rather than a day. A one-off DIY lining from full sheets costs less in materials and more in time.
How much does ply lining add to a van's weight?
A 6 mm wall in white Styrax core adds about 3.0 kg per square metre and a 12 mm eucalyptus film-faced floor about 7.8 kg per square metre. Work out the area of your van and multiply.
Can I use OSB or MDF to line a van?
Plywood is the usual choice: it bends slightly with the van, holds screws near the edge and does not swell like MDF in a damp van. OSB is heavier for the same stiffness and rougher to load against.
What is vanply?
Vanply is a name used in the UK trade for plywood sold for van lining, usually 6 mm wall panels and 9 to 12 mm anti-slip floors. Any well-made plywood of the right thickness, bond and face does the same job.