
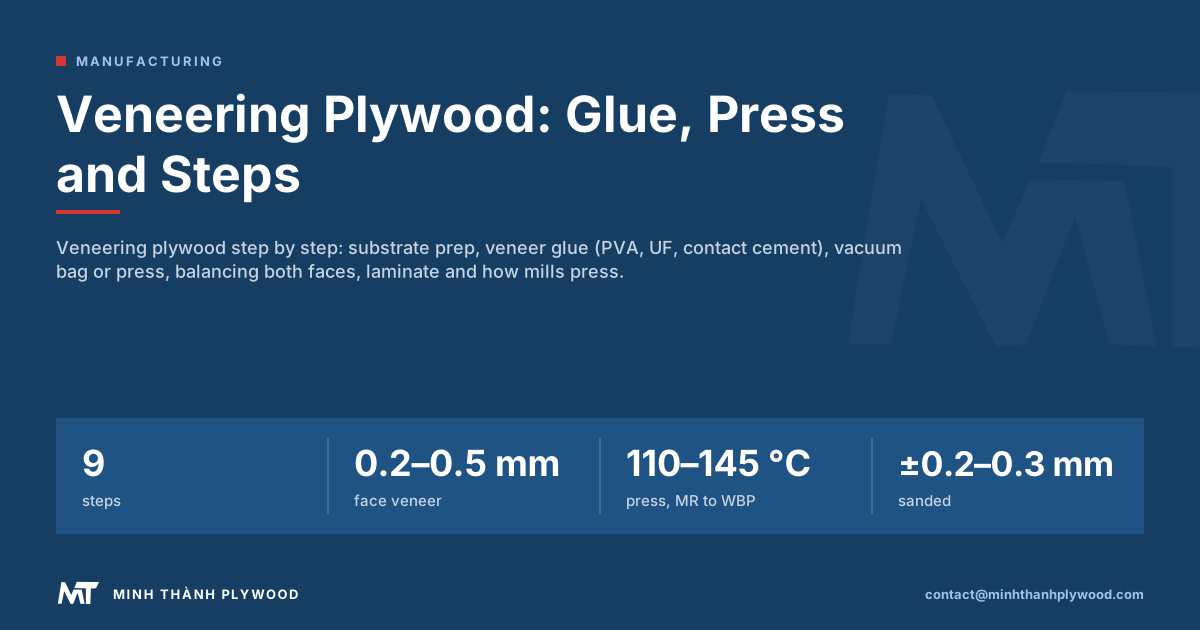
Veneering plywood means bonding a thin decorative wood leaf to a flat plywood core with glue and even pressure, on both faces. In a workshop that is PVA or contact cement with a vacuum bag or clamped cauls; in a mill it is UF glue in a heated press. Minh Thanh Plywood presses veneered furniture panels in Phu Tho, Vietnam, and this guide covers both routes.
What is veneering plywood?
Veneering plywood is the process of gluing a thin sheet of decorative wood, the veneer, onto a plywood substrate so the panel looks like solid wood but stays flat and stable. Plywood makes a good substrate because its cross-laminated core resists warping and holds screws.
A veneer leaf is sliced or rotary-peeled from a log. Face veneers on plywood are thin: in our industry they run about 0.2–0.5 mm, and European furniture buyers usually ask for about 0.3 mm. That thinness is why the substrate, the glue and the pressure decide the result far more than the veneer itself.
Two different jobs share the name:
- Veneering a plywood panel in a workshop: a cabinet or furniture maker bonds a chosen veneer onto a bought plywood sheet.
- Veneered plywood made in a mill: the plywood factory lays a face and back veneer on a calibrated core and hot-presses the panel. You buy it ready, as EV plywood, poplar, birch or okoume-faced plywood.
This guide covers the workshop method first, then how a mill does it, so you can decide which route fits your project.
How to apply wood veneer to plywood, step by step
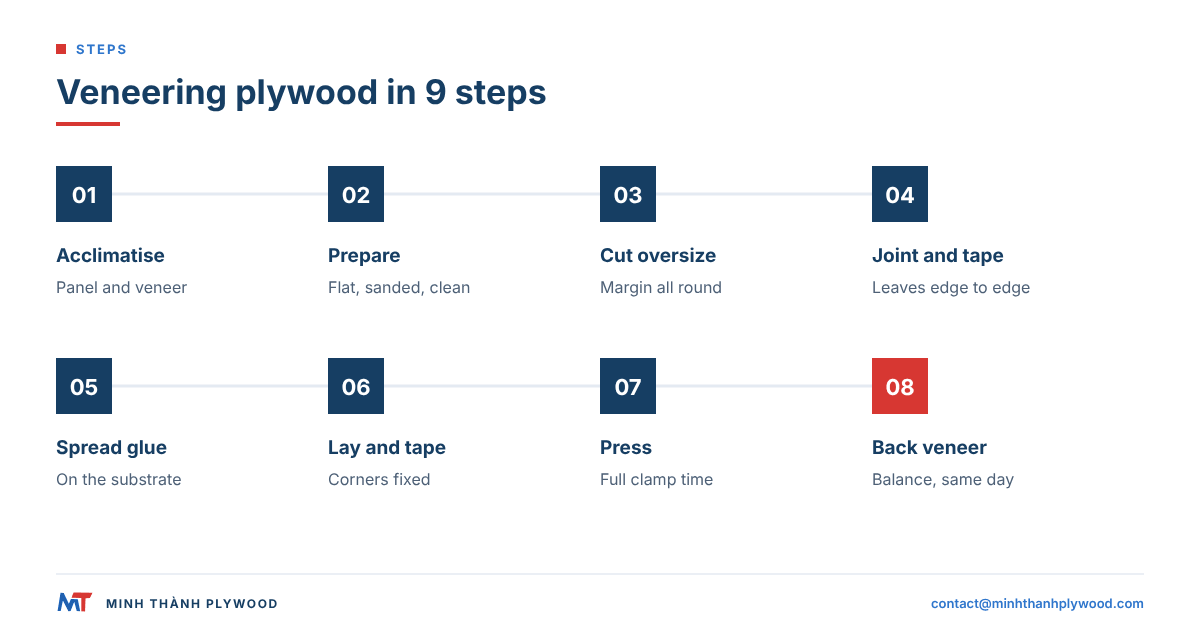
To apply wood veneer to plywood, prepare a flat substrate, spread glue evenly, press the veneer until the glue cures, and veneer the back the same way. These nine steps work for raw wood veneer with PVA or UF glue:
- Acclimatise the plywood and veneer in the room where you will work, so both reach the same moisture level.
- Check the substrate: flat, sanded, free of dust and oil. Fill dents and knock off raised grain.
- Cut the veneer oversize by a margin on every side, so you can trim to a clean edge later.
- Joint and tape the leaves if one leaf is narrower than the panel (see the matching section below).
- Spread glue on the substrate, not on the veneer, with a roller or notched spreader, in an even, thin, complete film.
- Lay the veneer and tape it at the corners so it cannot slide.
- Press in a vacuum bag, between clamped cauls or in a press, for the glue maker’s full clamp time.
- Veneer the back with a balancing leaf, by the same method, before the front has time to cup the panel.
- Trim, sand and finish once the glue has cured and the panel has rested flat.
| Step | What goes wrong if skipped | Sign on the panel |
|---|---|---|
| Acclimatise | Veneer shrinks or swells after pressing | Open joints, cracks along the grain |
| Clean, flat substrate | Glue fails on dust or dips | Bubbles, hollow sound when tapped |
| Even glue film | Dry spots or squeeze-through | Bubbles, dark spots of glue on the face |
| Full clamp time | Bond not cured when pressure is released | Lifting edges, blisters |
| Balancing back veneer | One-sided stress | Cupped panel |
The step that decides most results is the glue film. Too little leaves dry islands that blister; too much soaks through open-pored veneers and stains the face.
Which veneer glue should you use on plywood?
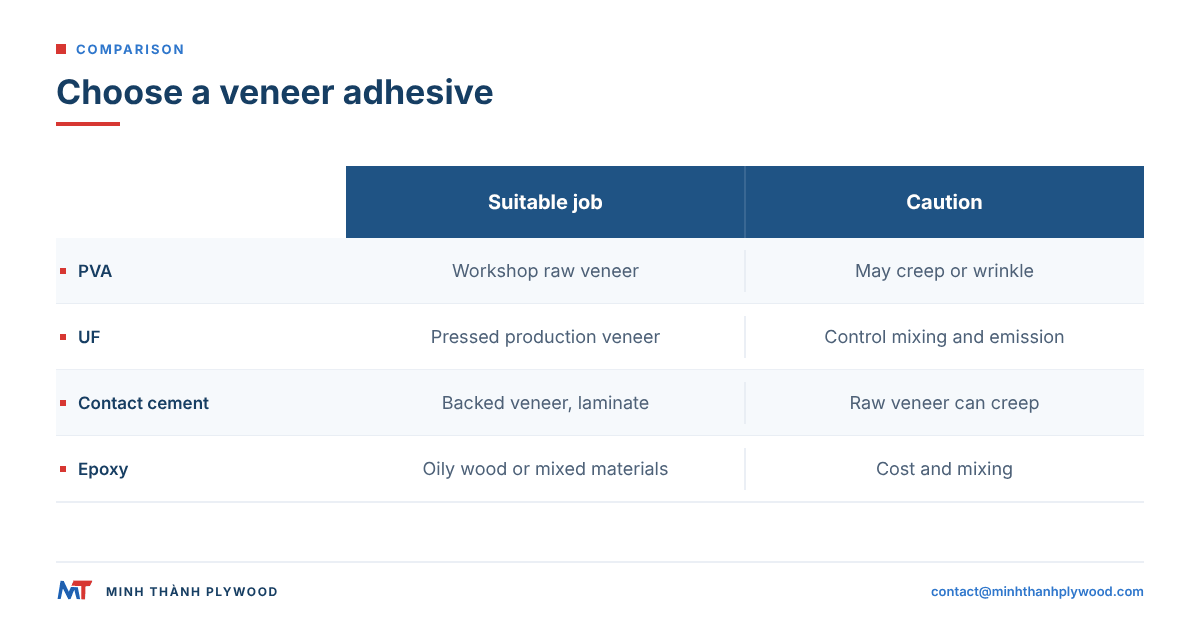
The best veneer glue for plywood is a rigid glue cured under pressure: a cross-linking PVA in a workshop, or UF glue in a heated press for production. Flexible glues hold the veneer quickly but let it move.
| Veneer glue | Best for | Pressing | Strength | Limits |
|---|---|---|---|---|
| PVA (white or yellow wood glue) | Small workshop panels, raw veneer | Vacuum bag or clamped cauls | Strong; cross-linking PVA resists moisture better | Can creep under load; high water content can wrinkle thin veneer |
| UF (urea-formaldehyde) powder or liquid | Production panels, raw veneer | Cold or heated press, vacuum bag | Rigid, no creep, little bleed-through | Mix ratio and pot life to manage; emission class to specify |
| Contact cement | Laminate, paper-backed veneer | Roller pressure, no clamps | Instant grab | Raw veneer can creep, bubble or crack along joints |
| Hot-melt veneer glue (iron-on film or pre-glued veneer) | Edges, small repairs | Household iron, then roller | Moderate | Heat can re-soften; poor for large faces |
| Epoxy | Oily species, wood to metal or composite | Clamps or vacuum | Very strong, gap-filling | Cost, mixing, cleanup |
| Hide glue (hot or liquid) | Traditional and restoration work | Hammer veneering or clamps | Good, reversible with heat and moisture | Sensitive to damp |
Is a rigid glue better than a flexible one?
A rigid glue keeps the veneer locked to the substrate when it takes up or loses moisture. PVA and contact cement stay slightly flexible; under seasonal movement a thin veneer on them can creep at joints or lift at edges. UF and epoxy set hard and do not creep, which is why production veneering relies on rigid resins.
Glue type and emission are two separate specifications
UF describes the resin; E0, E1 or CARB Phase 2 describe how much formaldehyde the finished panel releases. A UF glue can be formulated for different emission levels. Our furniture panels use UF glue at E0 emission. For the US, the TSCA Title VI limit for veneer-core hardwood plywood is 0.05 ppm under 40 CFR 770.10, and the panel’s certification shows it meets it. Mixing UF glue in the workshop is a separate exposure, which OSHA’s formaldehyde standard 1910.1048 covers with workplace exposure limits. The glue line of the plywood itself is rated under EN 314-2, the bonding-quality standard.
Contact cement veneer: when does it work?
Contact cement works for veneer that has a backing, such as paper-backed or phenolic-backed veneer, and for plastic laminates. On raw, unbacked wood veneer it is a weak choice, because the cement stays rubbery and lets the leaf move.
How to use contact cement for veneer:
- Apply an even coat to both the substrate and the veneer back.
- Wait until both are dry to the touch; a second coat may be needed on porous plywood.
- Lay dowels or spacer sticks on the panel, place the veneer, then pull them out one by one from the centre.
- Roll hard from the centre to the edges with a J-roller or veneer hammer.
The grab is instant, so there is no second chance to align. Water-based contact cements are easier on the workshop air; solvent-based ones grab faster. If a raw veneer must go on with contact cement, a paper-backed version of the same species is the better buy.
How to attach veneer to plywood: vacuum bag, cauls or press?
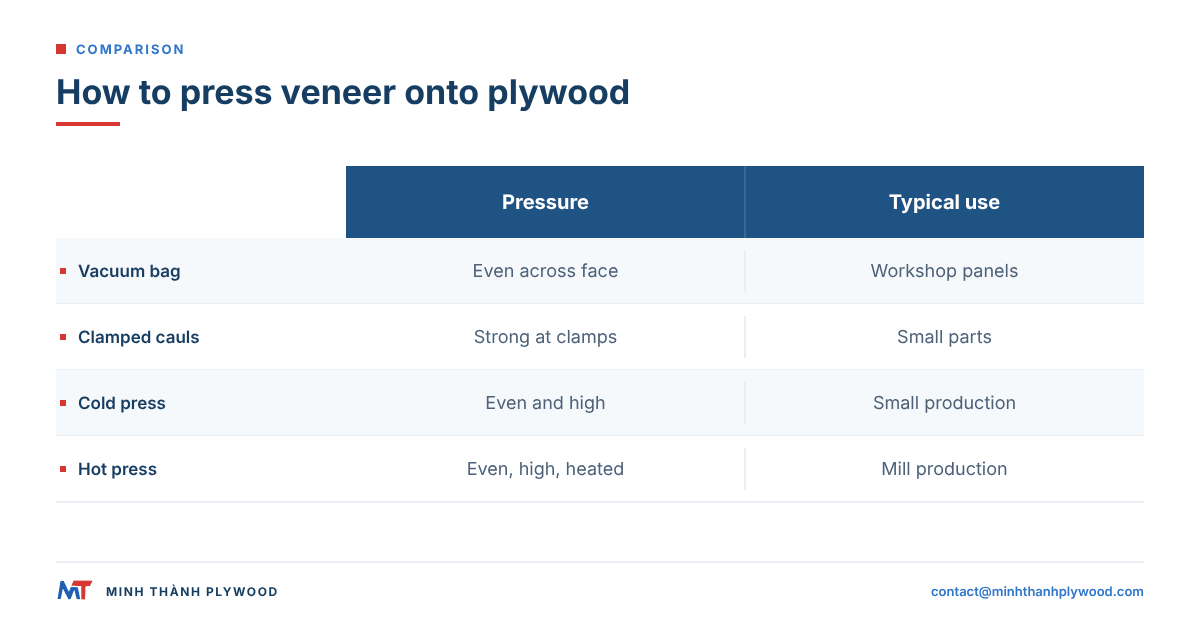
How to attach veneer to plywood comes down to pressure: it decides whether the glue film is thin and complete. Choose the method by panel size and volume.
| Method | Panel size | Pressure | Equipment | Fits |
|---|---|---|---|---|
| Vacuum bag | Up to the bag size, curved work too | Even atmospheric pressure over the whole face | Bag, pump, platen | Workshops, one-off furniture |
| Clamped cauls | Small panels | High at clamps, lower between; cambered cauls spread it | Flat boards, clamps | Small parts, doors |
| Cold press | Full sheets | Even, high | Screw or hydraulic press | Small production runs |
| Hot press | Full sheets in volume | Even, high, with heat to cure | Heated multi-daylight press | Plywood mills |
| Contact roller | Laminate, backed veneer | Point pressure from the roller | J-roller | Contact cement only |
A vacuum bag is the workshop standard because it presses every part of the face equally. Put a flat platen under the panel and a breather layer on top so air can leave from the centre. Clamped cauls work for small panels; a slight curve planed into each caul pushes pressure into the middle first.
Why must you veneer both sides of plywood?
You must veneer both sides because a single veneer pulls the panel into a cup. Glue adds moisture to the veneer, the veneer then dries and shrinks across the grain, and the face side shortens while the back does not.
The rule is balanced construction: the back carries a veneer of similar thickness and similar movement to the face, with its grain in the same direction. The back can be a cheaper species. Mills follow the same rule: every veneered plywood sheet has a face and a back, which is why grades are quoted as face/back pairs such as A/B or D+/D.
Veneer the back the same day, or press both faces in one cycle. A panel left with one face for several days may already be cupped before the back goes on.
How should you prepare the plywood substrate?
Prepare plywood for veneer by sanding it flat, removing dust and checking that the surface is sound. Any dent, raised grain or core gap under the face can show through a 0.3 mm veneer.
- Choose a smooth, calibrated core. A sanded furniture plywood with tight thickness holds a veneer far better than a rough commercial board. Our sanded furniture panels are made to ±0.2–0.3 mm, down to ±0.2 mm.
- Check flatness with a straightedge in several directions. A cupped substrate will not flatten under a vacuum bag.
- Sand with a fine-grit paper on a block or random-orbit sander, enough to open the surface; do not round the edges.
- Remove dust with a vacuum and a dry cloth. Oil or silicone from handling stops PVA from wetting the surface.
- Check the core: knock on the face. A hollow sound means a void under the face that will telegraph through the veneer.
- Match moisture: plywood and veneer should be close in moisture content. Our panels leave the factory at 8–12% moisture, the normal range for furniture plywood.
A core with overlaps or gaps telegraphs through thin veneer as ridges and dips. That is why furniture mills stitch their core layers: our cores are stitched horizontally and vertically before the faces go on. See stitched core plywood for why that matters.
How do you join and match veneer leaves?
Join veneer leaves by cutting a straight edge on both, taping them tight on the face side and pressing the taped sheet as one. Matching decides how the joined face looks.
| Match | How the leaves are laid | Look |
|---|---|---|
| Book match | Every second leaf is flipped like the pages of a book | Mirror image at each joint |
| Slip match | Leaves slide side by side in sequence, same side up | Repeating figure, no mirror |
| Random match | Leaves from different logs or out of sequence | Plank-like, informal |
| Centre match | Even number of equal-width leaves, joint in the centre | Symmetric face |
To make a tight joint, stack two leaves, clamp them between straight boards and plane or sand the edges together. Pull the joint closed with veneer tape on the show face and remove the tape after pressing. Blue painter’s tape on the glue side is a common mistake: it leaves a hollow line under the face.
How a leaf was cut changes the figure. Rotary peeled vs sliced veneer shows why rotary leaves are wide and wild while sliced leaves give a narrower, straighter grain.
How do you trim, sand and finish veneered plywood?
Trim veneered plywood after the glue has cured, with a sharp blade or a flush-trim router bit running against the substrate edge. Then sand lightly and finish.
- Trim the overhang with a knife cut from the face side, or a flush-trim bit. Cut downhill along the grain at the ends to avoid tear-out.
- Remove tape by moistening it lightly and scraping; do not sand through it.
- Sand with care: a face veneer of about 0.3 mm leaves little to remove. Use a fine grit by hand or with a light orbital sander, and stop as soon as the surface is even.
- Finish with the system you planned. Some oils and water-based coatings can lift glue spots or raise grain; test on an offcut first.
- Edge the panel with solid wood lip or edge banding before or after veneering, depending on the joint.
Sand-through is the commonest finishing fault: a dark core shows at the edges or high spots. On a factory panel the face arrives sanded and polished, and both faces of our panels are prepared UV-ready, to the standard customers need to apply their own UV coating.
How do you put laminate, formica or sunmica on plywood?
To put laminate (formica or sunmica) on plywood, bond it with contact cement or with PVA or UF glue in a press, and always laminate the back as well. High-pressure laminate is stiffer than veneer but moves with humidity, so the panel needs balancing in the same way.
- Cut the laminate oversize and sand the plywood face lightly.
- Apply contact cement to both surfaces and let it dry to the touch.
- Place spacer sticks on the plywood, lay the laminate, remove sticks from the centre out.
- Roll firmly from the centre to the edges.
- Trim with a flush-trim bit with a bearing and file the edges at a slight bevel.
- Laminate the back with a balancing sheet, or a cheaper backer laminate of matching movement.
For production, laminate goes on with PVA or UF glue in a press, which gives a rigid line and avoids the slow creep of contact cement. For kitchen and furniture carcasses, buyers often order plywood with a melamine or laminate face already pressed at the mill.
How do plywood mills hot-press veneer onto plywood?
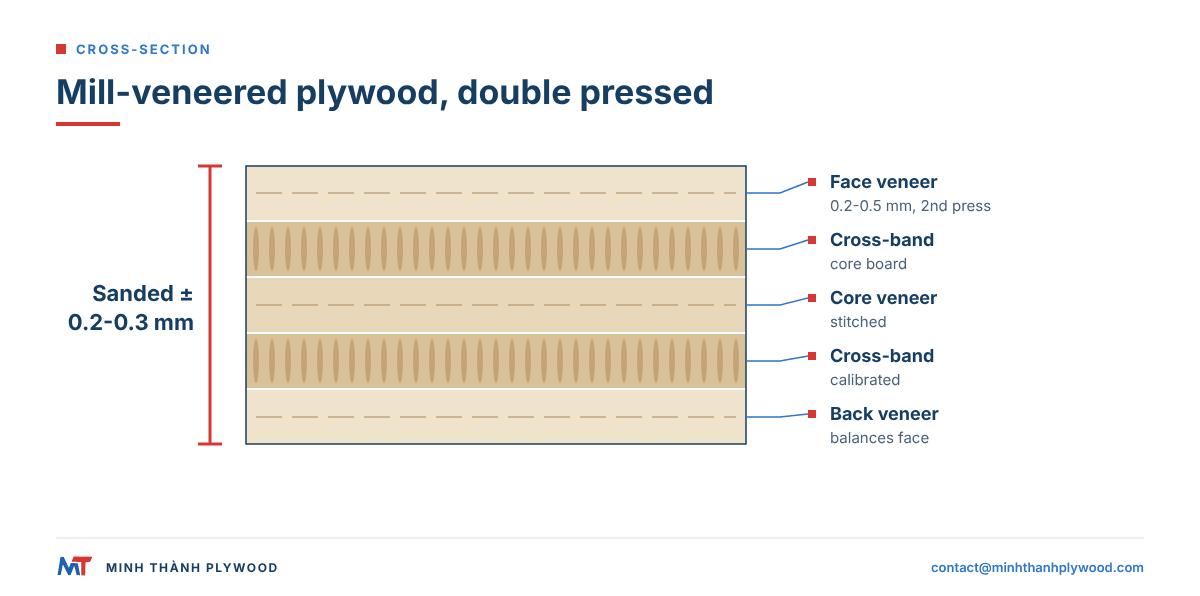
Plywood mills veneer plywood in a heated press: the core board is pressed and calibrated first, then the face and back veneers are glued on and pressed in a second cycle. At Minh Thanh Plywood every furniture-grade panel is pressed twice as standard.
| Stage | What the mill does | Why it matters for the face |
|---|---|---|
| Veneer drying | Face and core veneers dried in a dryer | Stops shrinkage cracks and glue problems; see veneer drying |
| Veneer grading | Faces sorted by grade and colour | Same look across the order; see veneer grading at our factory |
| Core lay-up and stitching | Core veneers laid cross-grain, stitched horizontally and vertically | No gaps or overlaps telegraphing through |
| First press | Core board glued and hot-pressed | Solid, flat core |
| Calibration sanding | Core sanded to thickness | Even surface for a thin face |
| Glue spreading | Glue roller coats the core | Even film, no dry spots |
| Second press | Face and back laid and hot-pressed | Face bonded flat; both sides balanced |
| Sanding and polishing | Faces sanded and polished | Ready for finishing |
| Inspection | Face, thickness, flatness and bond checked | Defects caught before packing |
Press temperature follows the glue: about 110–120 °C for MR glue and 130–145 °C for WBP (phenolic) glue. Furniture panels use UF glue at E0 emission. Because the core is calibrated before the face goes on, sanded furniture panels hold ±0.2–0.3 mm thickness tolerance, down to ±0.2 mm.
Double pressing is the main difference between a mill’s veneered panel and a workshop job: a calibrated core removes the dips that a single press leaves under a thin face. Our manufacturing page shows the full process, and plywood hot press and cold press compares the two pressing methods.
Which veneering faults happen, and what causes them?
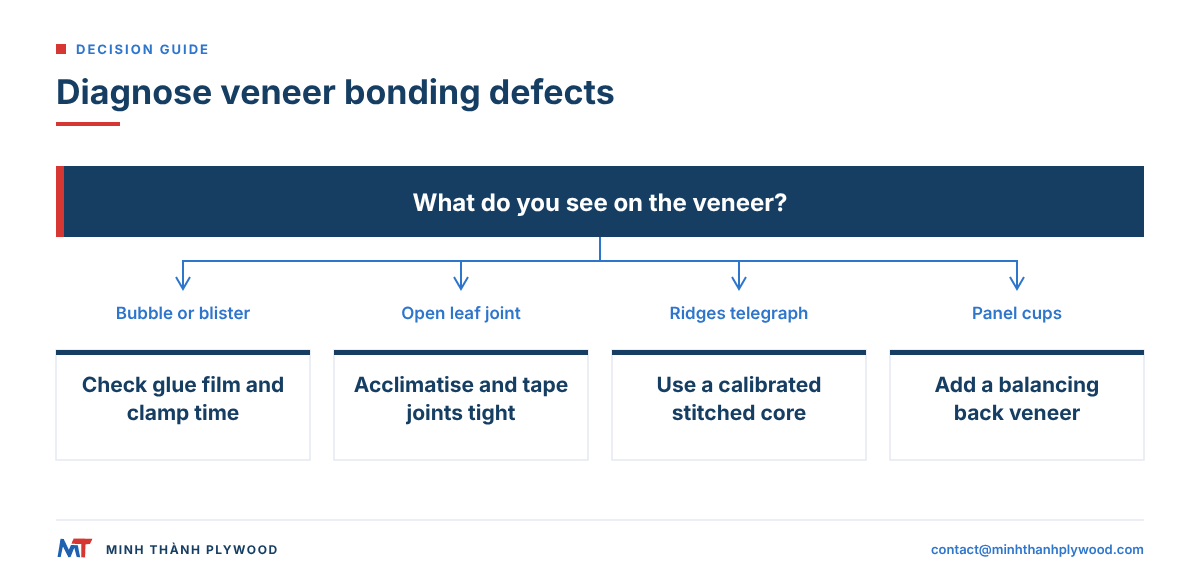
Most veneering faults come from the glue film, the pressure or moisture. Read the fault first, then fix the cause.
| Fault | Looks like | Main cause | Fix next time |
|---|---|---|---|
| Bubble or blister | Raised soft spot, hollow when tapped | Dry spot in the glue, pressure released early, dust | Even glue film, full clamp time, clean substrate |
| Glue bleed-through | Dark or shiny spots on an open-pored face | Too much glue, thin or porous veneer | Thinner film, tinted glue, less water in the glue |
| Open joint | Gap along a leaf joint | Veneer dried after pressing, poor jointing | Acclimatise, joint edges together, tape tight |
| Cracks along the grain | Thin splits across the face | Veneer too dry or too wet, glue too flexible | Match moisture, rigid glue |
| Telegraphing | Ridges and dips seen in raking light | Uneven substrate, core gaps or overlaps | Calibrated, stitched core; sand the substrate flat |
| Cupped panel | Panel bows toward the face | No balancing back veneer | Veneer both sides, same day |
| Edge lifting | Veneer peels at edges | Glue starved at edges, sanding through | Glue to the edge, trim after full cure |
| Sand-through | Darker core showing at high spots | Thin face, heavy sanding | Light hand sanding, flat substrate |
A blister can often be saved: slit it along the grain, work glue in with a syringe, and press it with a caul and a weight or a warm iron for hot-melt or PVA.
When should you buy veneered plywood instead of veneering it yourself?
Buy veneered plywood when you need more than a few panels of the same look. A mill bonds the face to a calibrated core in a heated press, sands and grades it, so every sheet in the order matches the approved sample.
| Decide by | Veneer it yourself | Buy factory-veneered plywood |
|---|---|---|
| Quantity | One-off pieces, a few panels | Repeat furniture runs, full containers |
| Face choice | Any veneer you can buy | 10+ face veneers: EV, poplar, birch, okoume, pine, and others on request |
| Flatness and thickness | Depends on substrate and press | Calibrated core, ±0.2–0.3 mm sanded |
| Emission | Depends on the glue you choose | UF glue at E0 emission; CARB P2 / TSCA Title VI certified |
| Cost per sheet | Higher in labour | Lower at volume |
| Consistency | Sheet to sheet | Matched to the approved sample |
Buying veneered plywood in the UK
Many UK buyers would rather buy veneered plywood than veneer it themselves, so here is what the UK shelf offers beside our container build. UK retailers sell veneered ply in 2440 × 1220 mm (8 x 4 ft) and 2500 × 1250 mm sheets, 3.6 to 25 mm, with crown-cut oak, walnut and ash faces, A/B and A/CC grades, one or two sides, E1 emission and an FSC option on selected lines.
| Point | UK retail reference (October 2026) | Minh Thanh Plywood |
|---|---|---|
| Sizes | 2440 × 1220 and 2500 × 1250 mm | 1220 × 2440 and 1250 × 2500 mm, or cut-to-size |
| Thickness | 3.6–25 mm (Plydirect cuts 4–30 mm to size) | 3–40 mm |
| Faces | Crown-cut oak, walnut, ash on poplar or birch | EV, poplar, birch, okoume, pine and others on request |
| Grades | A/B and A/CC, one or two sides | Face and back pairs such as EV A/B, poplar A/B, birch D+/D |
| Emission | E1 | E0 (CARB P2 / TSCA Title VI certified) |
| Certification | FSC on selected lines | EUDR dossier with each order |
| 3.6 mm oak veneered poplar, one side | £36.80 per sheet ex VAT | Raw FOB example from US$350/m³: about US$3.8 per sheet |
| 9 mm oak veneered poplar, one side | £48.89 per sheet ex VAT | Raw FOB example from US$350/m³: about US$9.4 per sheet |
| 10 mm oak veneered birch, two sides | £121.80 per sheet ex VAT | Quoted per face and grade |
Sheet-materials wholesaler prices are as listed by Sheet Materials Wholesale; sizes and cut-to-size terms are from Plydirect and Chiltern Timber. Our column converts the starting container price per m³ of furniture and interior plywood to one 1220 × 2440 mm sheet (sheet volume = 2.44 × 1.22 × thickness in metres, times US$350/m³). That is a raw FOB example for a plain panel, not a sheet price: a real quote adds the face veneer, grade, packing, freight, UK import duty and VAT.
On the import side, plywood falls under commodity code 4412 in the UK Trade Tariff, where the third-country duty on veneered panels with a non-coniferous outer ply (4412 33 and 4412 34) is 6% and VAT is 20%. Vietnam-origin goods can claim the UK-Vietnam trade agreement preference with a proof of origin; check the exact subheading on the GOV.UK tool before you price a container. A UK trade buyer who needs repeat sheets of the same face then sees the margin between a retail sheet and a container load.
Engineered veneer (EV) is a reconstituted veneer with a repeatable grain and colour, made from fast-growing wood. It is our most produced face; see EV plywood. Before ordering any veneered plywood from Vietnam, check the core species, the press method, the glue and emission class, the face grade against a sample, and the thickness tolerance. Our plywood quality control page shows how we inspect each of those.
What should you put in an order for veneered plywood?
A veneered plywood order should state the face and back veneer, the core, the glue and emission class, the thickness and tolerance, the size and the packing. Send these lines and we quote the exact build:
- Application: furniture, kitchen cabinets, doors, wall panels, shopfitting.
- Core: white Styrax or Eucalyptus as standard; Acacia or Pine on order. Stitched core for a flat face.
- Glue and emission: UF glue at E0 emission for interiors; MR (melamine-fortified) or phenolic WBP to your specification.
- Face and back: species and grade pair, for example EV A/B, poplar A/B or birch D+/D, sanded and polished, UV-ready if you coat.
- Panel: thickness from 3 to 40 mm, 1220 × 2440 or 1250 × 2500 mm, or cut-to-size.
- Packing and quantity: export packing, one 40HC with mixed specifications by agreement, destination port.
Production is 15–45 days after the 30% deposit, FOB Hai Phong, CFR or CIF, with free samples to approve the face before the order. Send your specification by email to contact@minhthanhplywood.com, and we reply within hours.
Buyer questions, answered
How do you apply veneer to plywood step by step?
Sand the plywood flat and clean, cut the veneer oversize, spread glue evenly on the substrate, lay the veneer, press it with a vacuum bag, clamped cauls or a press until the glue cures, veneer the back the same way, then trim, sand and finish.
What is the best glue for veneering wood?
For most workshop veneering on plywood, a cross-linking PVA or a urea-formaldehyde (UF) veneer glue with a vacuum bag or press gives the most durable bond. Contact cement suits laminate and paper-backed veneer but can let raw wood veneer creep or bubble.
Can you use contact cement for wood veneer?
Yes, mainly for paper-backed or phenolic-backed veneer, where the backing stops the leaf from moving. Raw wood veneer on contact cement can lift, crack or show glue lines over time, so a rigid glue under pressure is the safer choice.
Do you need to veneer both sides of plywood?
Yes. A veneer on one face pulls the panel into a cup as the veneer and glue take up and lose moisture. A balancing veneer of similar thickness on the back keeps the panel flat.
Can you veneer plywood without a vacuum press?
Yes. Small panels can be pressed between flat cauls with clamps, or veneered with contact cement or iron-on hot-melt glue. A vacuum bag gives even pressure over the whole face, which matters most on large panels.
How long should veneer stay under pressure?
Leave it pressed for the full clamp time the glue maker states for your temperature, then let the panel rest flat before trimming. Releasing early is the most common cause of bubbles.
What is veneer plywood?
Veneer plywood is plywood whose face and back are a decorative wood veneer, such as poplar, birch, okoume or engineered veneer (EV), pressed onto a plywood core. The core gives strength and flatness; the face veneer gives the look.
How do you put laminate on plywood?
Sand and dust the plywood, apply contact cement to both the plywood and the back of the laminate, wait until both are touch-dry, align the sheet with spacer sticks, press from the centre out with a J-roller, then trim with a flush bit and file the edges.
Is it cheaper to veneer plywood yourself or buy veneered plywood?
For a few panels, veneering yourself can make sense. For repeat furniture production, factory-veneered plywood is usually cheaper per sheet and more consistent, because the face, glue, pressure and sanding are controlled in one process.
What glue do plywood factories use for veneer?
Furniture plywood mills mostly use UF glue at E0 emission, cured in a heated press. Melamine-fortified and phenolic (WBP) bonds are used where the panel needs more water resistance.