
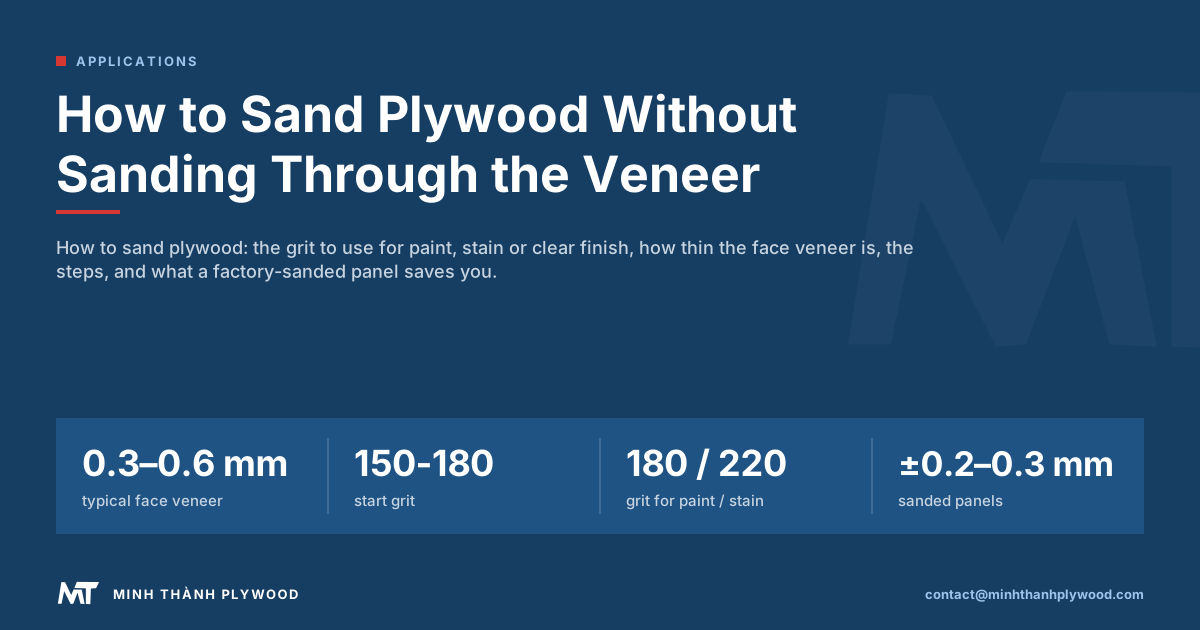
You can sand plywood, but only lightly: the face is a thin veneer, so a factory-sanded panel needs a scuff with fine grit, not stock removal. Start at 150 or 180 grit, finish at 180 for paint and 220 for stain or clear coats, and never sit a coarse belt in one place. Minh Thanh Plywood sands and calibrates furniture panels before dispatch, so most of the work is done.
Can you sand plywood?
You can sand plywood, but you sand it to prepare a finish, not to shape or level it. The visible face is a single veneer glued to the core, so every pass removes part of the only good layer the panel has.
A furniture-grade sheet is already sanded at the mill, so it needs only a light pass before paint, stain or a clear coat. A rough construction or packing panel can be sanded smoother, but it will not become a furniture face: its veneer grade, patches and open defects stay.
Three rules decide whether sanding helps or ruins a sheet:
- Start fine. Begin at 150 or 180 grit on a factory-sanded face. Coarse grit belongs to the mill’s calibrating sander, not to site work.
- Keep moving. A sander that stays in one spot cuts a dish through the face in seconds.
- Follow the grain. Final strokes run along the face grain, so scratches hide in it.
Sande plywood vs sanded plywood: which one do you have?
“Sande” and “sanded” are different things, and the two are often confused. Sande plywood is a tropical hardwood-faced panel, made from Sande (Brosimum utile) grown mostly in Ecuador and Colombia, and sold at US big-box stores such as Home Depot as 18 mm “3/4 in category” 4 × 8 ft sheets with an actual thickness of 0.709 in (18 mm). Sanded plywood is any panel whose face has been sanded at the mill, whatever the species.
| Point | Sande plywood | Sanded furniture plywood |
|---|---|---|
| What the name means | A species-faced product, sold under the Sande name | A finish state: face sanded smooth |
| Face | Pale tropical hardwood, smooth grain | Poplar, birch, pine, eucalyptus or engineered veneer |
| US size | 4 × 8 ft, 18 mm sold as 3/4 in category (actual 0.709 in) | 1220 × 2440 mm, thickness held to ±0.2–0.3 mm |
| Before you sand | Already sanded; scuff at 180 to 220 grit | Already sanded; scuff at 180 to 220 grit |
The sanding advice is the same for both: the face is one thin veneer, so a light scuff sand is all it needs before paint or stain. Minh Thanh’s sanded poplar, birch and eucalyptus faces are calibrated to ±0.2–0.3 mm, so the sheet is flat before your sander touches it.
How thin is the face veneer on plywood?
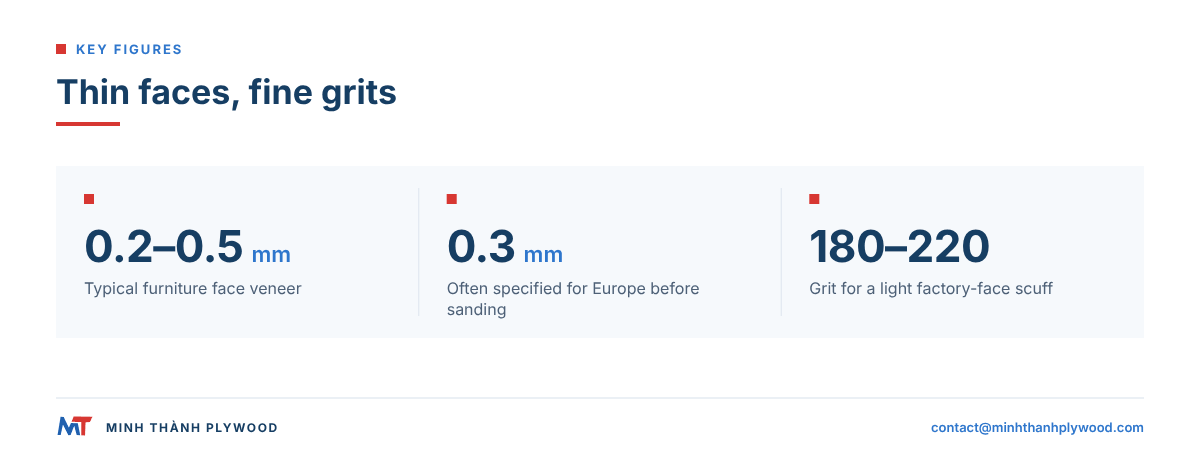
Face veneers on furniture plywood are typically 0.2–0.5 mm thick (about 0.008–0.020 in), often 0.3 mm for Europe before the mill sands them, and sanding removes part of that. That is why plywood can only be sanded lightly: there is no spare wood under the face.
The face thickness depends on the product and the species:
| Panel type | Face | What it means for sanding |
|---|---|---|
| Furniture plywood, sanded | Poplar, birch, okoume, engineered veneer | Factory-sanded face; scuff at 180–220 grit only |
| Birch-faced plywood | Birch veneer | Dense, smooth face; blotches if sanded unevenly |
| Pine-faced plywood | Pine veneer | Hard latewood and soft earlywood; sand by hand on edges |
| Commercial plywood | Hardwood or mixed veneer | Thinner, lower-grade face; patches show through paint |
| Film-faced plywood | Resin film over veneer | Scuff only to key a coating |
| Packing plywood | Utility veneer | Not made for a finish; sand for splinters only |
The core veneers below the face run across the grain. Once you cut through the face, the next layer shows in a different direction and often a different colour, and no filler or stain hides it.
The face is the part of the panel you pay for. For scale, Minh Thanh builds a thin 4 mm furniture panel from three 1.3 mm Styrax core veneers and two faces: every layer of a plywood sheet is thin. Treat every face as a layer you prepare, never one you remove.
What grit to sand plywood?
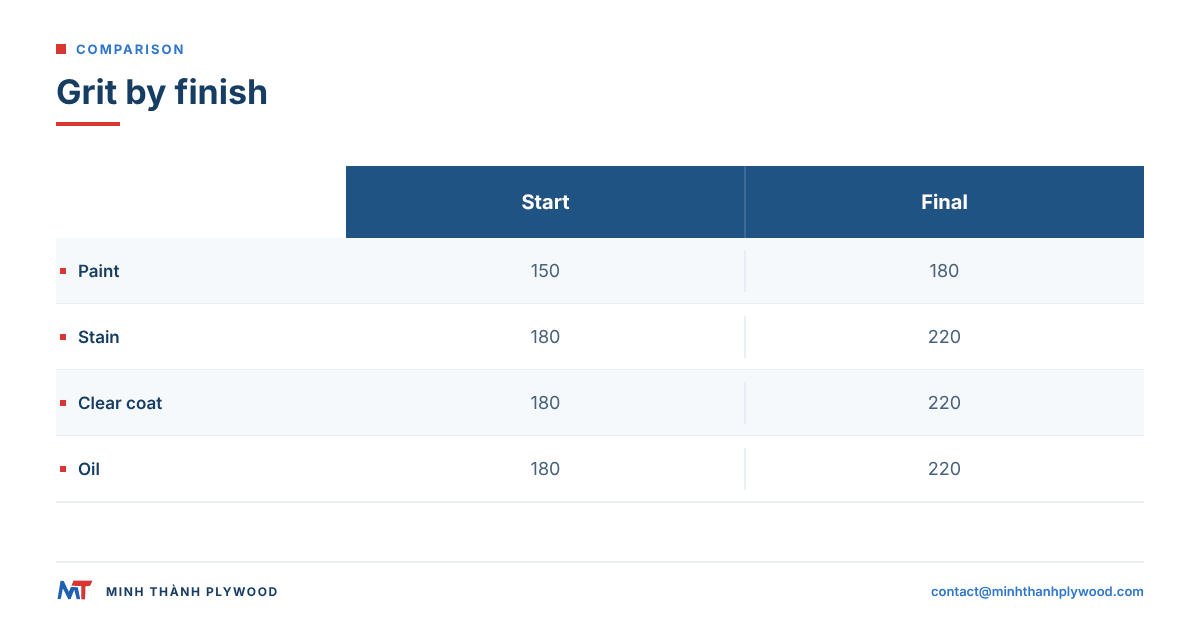
Use 150 or 180 grit to start on a factory-sanded plywood face and finish at 180 grit for paint or 220 grit for stain and clear finishes. Coarser grit is only for a local repair, and only for a few strokes.
| Finish | Start grit | Final grit | Between coats | Notes |
|---|---|---|---|---|
| Paint, solid colour | 150 | 180 | 220–320 on primer | Primer fills fine scratches |
| Stain, water or oil | 180 | 220 | 320 on sealer | Even sanding limits blotching |
| Clear lacquer or polyurethane | 180 | 220 | 320 | Scratches show under clear coats |
| Oil or hard-wax oil | 180 | 220 | — | Do not polish past 240 or oil soaks in unevenly |
| UV or factory coating line | Mill-sanded face | — | Line’s own spec | Ask for a UV-ready face instead |
| Laminate or veneer overlay | 120 | 150 | — | A slight key helps the glue |
Two notes keep the table honest. First, “grit” here means the FEPA P-scale used on most European abrasives (P180, P220); US CAMI grits are close enough at these numbers for site work. Second, skipping grits is what leaves swirl marks: go from 150 to 180 to 220, not from 120 to 220.
How to sand plywood: the steps
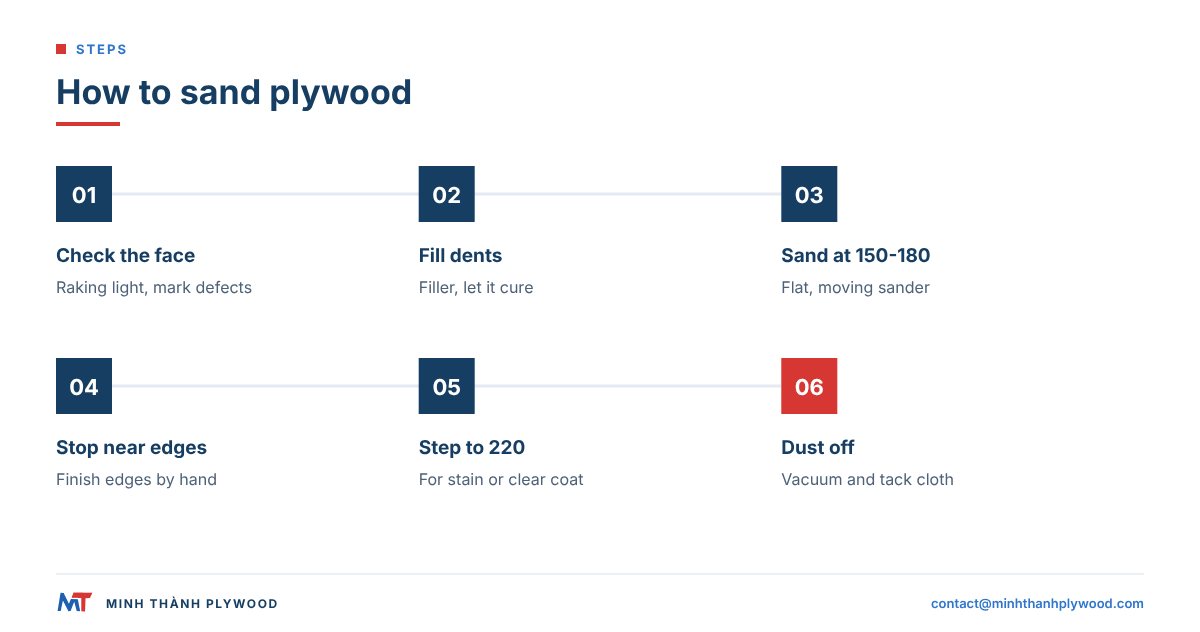
Sanding plywood well is a short, repeatable process. These steps fit a full sheet or a set of cut parts.
- Check the face first. Look along the sheet under a low, raking light for dents, glue spots and raised grain. Mark them with a pencil so you treat them locally.
- Fix defects before you sand. Fill dents and small splits with a fine wood filler matched to the face, and let it cure. Sanding a dent out removes too much face.
- Fit the sander. Use a random-orbit sander with a soft or medium pad and a fresh 150 or 180 grit disc, connected to dust extraction. Fine wood dust is a health hazard: the UK Health and Safety Executive’s wood dust guidance says it can cause asthma and that the COSHH Regulations 2002 require workers to be protected, and its guidance on cutting and sanding wood calls for on-tool extraction and respiratory protection.
- Sand the field. Lay the sander flat, switch it on against the face, and move it in overlapping passes at a slow walking pace. Do not tilt it or press down.
- Stop at the edges. Ease off within a hand’s width of every edge and corner, where the face cuts through first. Finish edges by hand.
- Step up one grit. Change to 180, then 220 for stain or clear finish, and repeat the same pattern. Each grit only removes the scratches of the one before.
- Hand-sand along the grain. Finish with the last grit on a cork or felt block, with the grain, to remove orbital swirls.
- Remove the dust. Vacuum, then wipe with a dry microfibre or tack cloth. Dust left in the pores spoils stain and clear coats.
- Inspect with light and a pencil. Draw light pencil lines across the face and sand until they disappear evenly; any line left marks a low spot you missed.
A full 1220 × 2440 mm sheet takes a few minutes per grit when the face arrives sanded. If it takes much longer, the panel was not sanded at the mill or you are using too coarse a grit.
Sanding plywood for painting
Sanding plywood for painting needs less work than for stain: finish at 180 grit, prime, then sand the primer smooth. Paint hides the grain but shows every bump and ridge, so flatness matters more than fineness.
- Before primer: one pass at 150 and one at 180. Finer than 220 polishes the face and primer grips less.
- Primer: use a primer that suits the paint system; water-based primers raise the grain on the first coat.
- After primer: sand at 220–320 grit to knock down raised fibres and dust nibs. Wipe off the dust.
- Between coats: a light scuff at 320 grit.
- Last coat: do not sand.
Paint shows the face grade underneath. A B-grade face with patches will telegraph its repairs through a thin coat. For painted furniture parts, order a face grade fit for paint, such as a B/B pair on poplar, and sanded faces from the mill. See how to paint plywood for primer and paint choices.
How to sand plywood for staining
To sand plywood for staining, finish at 220 grit, sand every part of the face the same way, and use a pre-stain conditioner on birch and poplar. Stain shows uneven sanding as darker and lighter patches.
Stain soaks in where fibres are open and stays on top where the face is burnished or sealed. Plywood faces are rotary-cut, so the grain changes from tight to open across a sheet, and birch and poplar blotch even when sanded perfectly.
What works on site:
- Sand the whole face at 180, then 220, with the same pressure and number of passes everywhere.
- Raise the grain with a damp cloth, let it dry fully, and sand it once more at 220.
- Apply a wood conditioner or a thin wash coat, as the stain maker states, to even out absorption.
- Test the stain on an offcut of the same sheet, never on a different panel.
- Wipe off excess stain within the time the product states.
Can you sand and stain plywood? Yes, and gel stain is the most forgiving on plywood faces because it sits on top. The guide on how to stain plywood covers stains by species.
Sanding for clear finishes, oil and lacquer
For a clear finish, sand plywood to 220 grit and remove every scratch, because clear coats magnify them. Oil finishes stop at 220 grit; going finer closes the surface and the oil absorbs unevenly.
- Water-based clear coats: the first coat raises the grain. Sand it at 320 grit, wipe, and continue.
- Polyurethane and lacquer: sand between coats at 320 grit, the last coat unsanded.
- Hard-wax oil: one or two thin coats on a 220-grit face; buff, do not sand between coats unless the maker says so.
- Sanding sealer: a sealer coat sanded at 320 grit gives an even base on open-grained faces.
Clear finishes also show sanding swirls from an orbital sander. Finish by hand along the grain at the last grit, and check under a raking light before the first coat.
Can you sand through plywood veneer?
Yes, you can sand through plywood veneer, and it happens fastest at edges, corners and over glue lines. Once the cross-grain core layer shows, the spot cannot be stained to match.
Signs you are close:
- The colour changes slightly or the grain pattern starts to fade.
- A faint line of glue or a darker shadow appears.
- The face feels warm under the pad: friction is building in one place.
How sand-through happens:
- Belt sanders. A hand belt sander removes more wood per second than the face can spare. Do not use one on veneered plywood.
- Coarse grit. 80 or 100 grit cuts deep scratches that need several grits to remove.
- Tilted sanders. Tilting the pad concentrates all the pressure on its edge.
- Edges and arrises. Corners have face on one side only, so they cut through first.
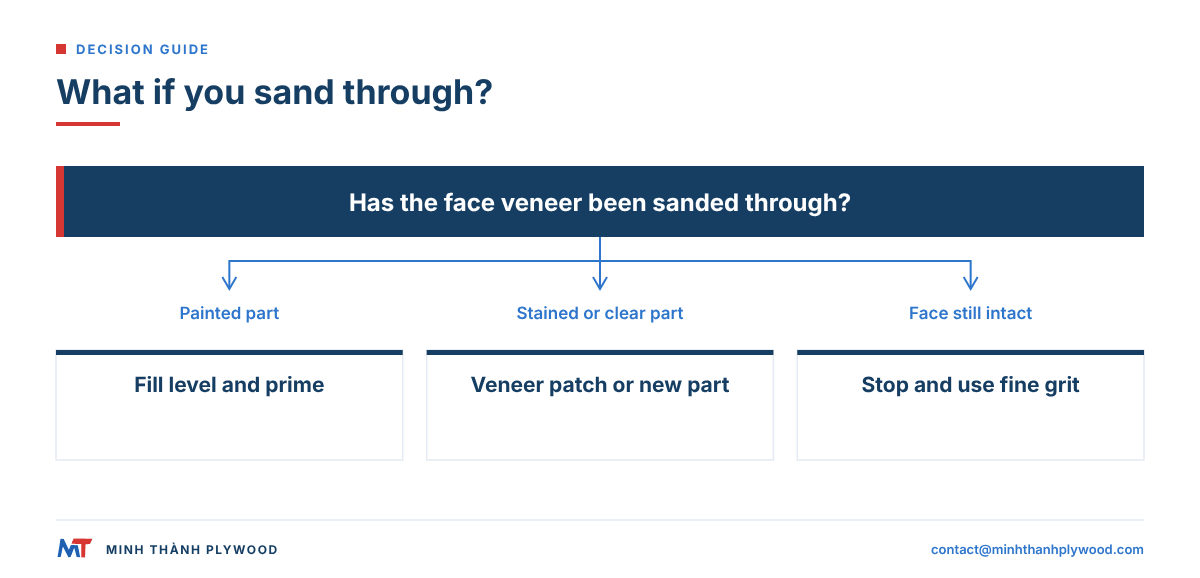
If you cut through: on a painted part, fill the spot level and prime it. On a stained or clear part, the only real repair is a veneer patch or a new part. Buy a face grade and a sanded face that need no heavy sanding in the first place.
Which sandpaper for plywood works best?
The best sandpaper for plywood is aluminium-oxide or ceramic abrasive on a film or mesh backing, in grits 150 to 220, used on a random-orbit sander with dust extraction. Film and mesh discs cut evenly and clog less on resinous faces.
| Choice | Use on plywood | Avoid |
|---|---|---|
| Aluminium oxide, film-backed | Main choice for faces, 150–220 | — |
| Mesh discs | Dust-free sanding of large faces | Very soft pads on edges |
| Ceramic | Long runs in a workshop | Coarse grits on faces |
| Stearated paper | Between coats, 220–320 | Bare wood before water-based stain |
| Garnet | Hand sanding, fine work | Machine use |
| Sanding sponge | Edges, profiles | Flat faces |
Sanders by job:
- Random-orbit sander: faces and parts. The orbit hides scratches.
- Detail or delta sander: inside corners; light pressure only.
- Hand block: edges, final strokes along the grain.
- Wide-belt or drum sander: a workshop tool for calibrating thick stock; on plywood, use only at the lightest setting with fine grit.
Change discs as soon as they stop cutting. A dull disc polishes and heats the face, which causes swirl marks and uneven stain.
How to sand plywood edges
Sand plywood edges by hand on a block, at 120 then 180 grit, with the block flat on the edge and away from the faces. The edge shows end grain on every second layer, so it sands unevenly and fuzzes.
- Break the arris. A few strokes at 45° with 180 grit take off the sharp corner and stop splinters. Do not round it: the face cuts through at the corner.
- Fill before paint. Exposed edges take a skim of filler or edge primer, sanded at 180, so paint does not soak into the end grain.
- Band before stain. A stained or clear part looks better with veneer edge banding or solid lipping, sanded flush to the face by hand.
- Seal before exterior use. Edges take up water fastest; seal them, as the guide on how to seal plywood edges explains.
For banding options, see how to finish plywood edges.
Factory sanding vs site sanding: what a calibrated panel saves you
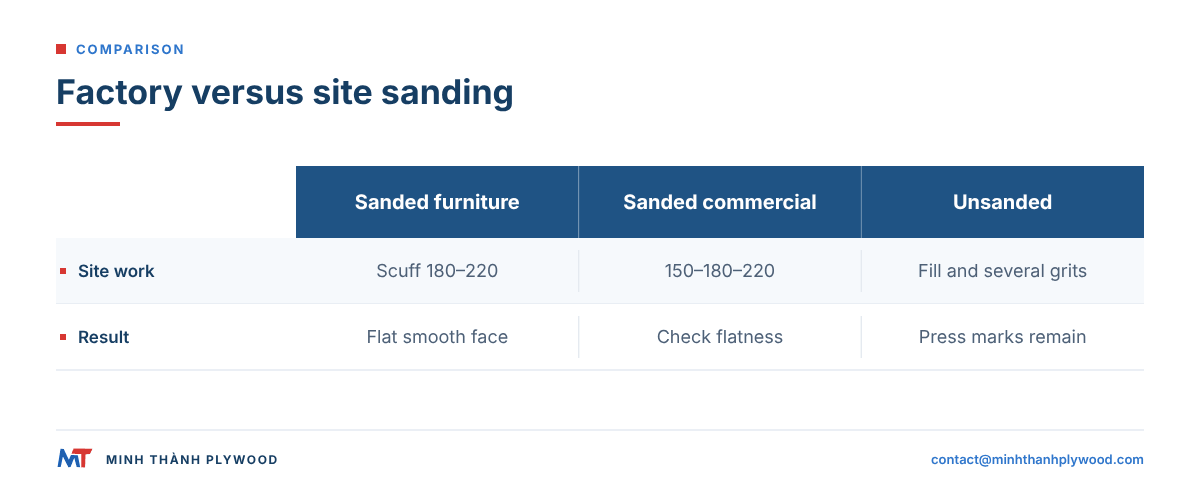
A factory-sanded and calibrated panel arrives flat and within tolerance, so site sanding is only finish preparation. Calibration is done at the mill on wide-belt sanders before the face goes on; site sanding cannot correct thickness.
At Minh Thanh, furniture-grade panels are pressed twice: the core board is pressed and calibrated first, then the face and back are pressed on. The faces are sanded and polished, and sanded furniture panels hold a thickness tolerance of ±0.2–0.3 mm, down to ±0.2 mm. Both faces are UV-ready, to the standard customers need to apply their own UV coating.
What that means at the bench:
| Panel | What you do on site | Why |
|---|---|---|
| Calibrated, sanded furniture panel | Scuff at 180–220 and finish | Face already flat and smooth |
| Sanded commercial panel (±0.5 mm) | 150–180–220, check flatness | Thickness and face vary more |
| Unsanded panel | Fill, then several grits; low result | Press marks and open grain remain |
A tight tolerance also matters for parts that meet: drawer fronts, doors and shelves line up without a sanded step at the joint. See the plywood thickness guide for nominal and actual thickness by panel.
Sanding birch, poplar, pine, eucalyptus and film-faced plywood
Each face species sands differently, so match pressure and grit to the face, not to the sheet thickness.
- Birch: dense, fine and pale. Sands smooth fast at 180–220 grit but blotches under stain; use a conditioner. Birch faces are graded D+, D and E in Vietnam and quoted as pairs such as D+/D, so order the grade your finish needs.
- Poplar: soft and even, ideal for paint. It fuzzes easily, so raise the grain and sand once more before primer. Poplar faces are quoted as A/A, A/B or B/B.
- Pine: hard latewood, soft earlywood. A random-orbit sander dishes the soft rings; finish by hand along the grain.
- Okoume: pinkish, mild figure, sands easily; edges splinter, so break the arris early.
- Eucalyptus: harder and denser; takes a little longer per grit and sands to a crisp face.
- Engineered veneer (EV): a reconstituted, dyed face. The colour runs only through the veneer, so sand very lightly at 220.
- Film-faced: scuff with 180–240 grit only to key a new coat; do not sand through the film.
For birch finishing in detail, see how to finish birch plywood. The birch plywood product page lists the grades we supply.
Common sanding mistakes on plywood
Most sanding damage on plywood comes from too much: too coarse, too long in one place, too much pressure. These are the mistakes buyers report most when parts come back from finishing.
| Mistake | Result | What to do instead |
|---|---|---|
| Starting at 80 or 100 grit | Deep scratches, thin spots | Start at 150 or 180 |
| Belt sander on a face | Sand-through in seconds | Random-orbit sander only |
| Pressing down on the sander | Dished spots, heat | Let the pad’s weight do the work |
| Skipping grits | Swirls under stain | Step one grit at a time |
| Sanding edges with the machine | Rounded, cut-through arris | Hand block on edges |
| Leaving dust on the face | Muddy stain, rough clear coat | Vacuum and tack cloth |
| Sanding to fix thickness | Thin face, uneven parts | Buy calibrated panels |
What this means for your order
If your plant or your customers finish plywood, order the face, grade and sanding you need so the finishing line only scuffs and coats. Write these lines on the order:
- Face and grade: for example poplar B/B for paint, or birch D+/D for clear finish.
- Sanding: sanded faces, calibrated, UV-ready if you coat on a UV line.
- Thickness tolerance: ±0.2–0.3 mm on sanded furniture panels.
- Core and glue: white Styrax or Eucalyptus core, UF glue at E0 emission.
- Moisture: 8–12 % at dispatch, the normal range for furniture plywood.
For a US destination, the formaldehyde limit for hardwood plywood with a veneer core is 0.05 ppm under 40 CFR 770.10.
Minh Thanh sends free samples of the exact build, so your finishing team can run a sanding and coating test before the order. Send your specification to contact@minhthanhplywood.com, or read how to finish plywood for the full finishing sequence and the furniture plywood range.
Buyer questions, answered
Can you sand plywood?
Yes. Sand plywood lightly with fine grit to prepare it for finishing. The face is a thin veneer, so remove only the surface fibres and never level a panel with coarse grit.
What grit should I use to sand plywood?
Use 150 or 180 grit on a factory-sanded face, finish at 180 for paint and 220 for stain or clear coats. Use 120 only to remove a scratch or a raised spot, and only briefly.
Can you sand through plywood veneer?
Yes. A coarse belt sander, a random-orbit sander held in one spot, or edges sanded hard can cut through the face in seconds. The next layer shows as a different colour or grain direction.
How thin is the face veneer on plywood?
Face veneers on furniture plywood are typically 0.2–0.5 mm thick, and part of that is removed when the mill sands the panel. Treat every face as thinner than a sheet of card.
Can you sand plywood smooth?
Yes. A good furniture panel reaches a smooth face at 180–220 grit with a random-orbit sander. If the face stays rough or fuzzy, raise the grain with a damp cloth, let it dry and sand again at the last grit.
Do I need to sand plywood before staining?
Yes, a light pass at 180 then 220 grit removes handling marks and opens the face evenly. Use a pre-stain conditioner on birch and poplar to limit blotching.
Can you sand birch plywood?
Yes, birch sands well, but its face is thin and stains blotchy if sanded unevenly. Sand with the grain at 180 and 220 grit and keep the sander moving.
Should I sand plywood between coats of paint?
Yes. Sand the primer and each coat except the last with 220–320 grit to flatten raised grain and dust nibs, then wipe the dust off before the next coat.
Can you sand film-faced plywood?
Only to key the surface for a new coating. The film is a resin layer, so scuff it with fine grit; sanding through it exposes the wood face to water.
Why does my plywood get fuzzy after sanding?
Fuzz is raised fibres from soft or torn grain, or from water in a primer or stain. Let the first coat dry, sand it at 220–320 grit and recoat.