
Levelling a floor with plywood works only over a sound, sufficiently flat base. A suitable underlayment smooths small local irregularities but does not repair a sagging structure. Choose finish-rated plywood underlayment for resilient flooring and a tested subfloor-and-backer assembly for ceramic tile. Minh Thanh supplies exterior plywood substrates, not an automatically certified APA underlayment or tile system.

Levelling floor with plywood: when does it work?
Levelling a floor with plywood works when the floor under it is sound and within the required flatness: it can smooth minor gaps and board edges but cannot cure structural sag. Use only a panel rated for the chosen underlayment duty and covering. For tile, the substrate and backer layers must follow an approved assembly.
What plywood cannot do is make a sloping or sagging floor level. A thin sheet follows the shape under it. If the floor drops 15 mm from one wall to the other, an overlay screwed to it drops 15 mm too. That kind of fault needs packers, sistered joists or a levelling compound before the plywood goes down.
Three questions decide the method:
- Is the structure sound? No springy joists, rot, or loose boards that cannot be fixed.
- How uneven is it, in millimetres? Measure with a straightedge and a level, not by eye.
- What finish goes on top? Tile needs a stiffer, flatter base than vinyl or carpet.
Our pillar on plywood for subfloors covers the structural layer below; this guide covers getting the surface flat.
How uneven is your floor? Choose the method by millimetres
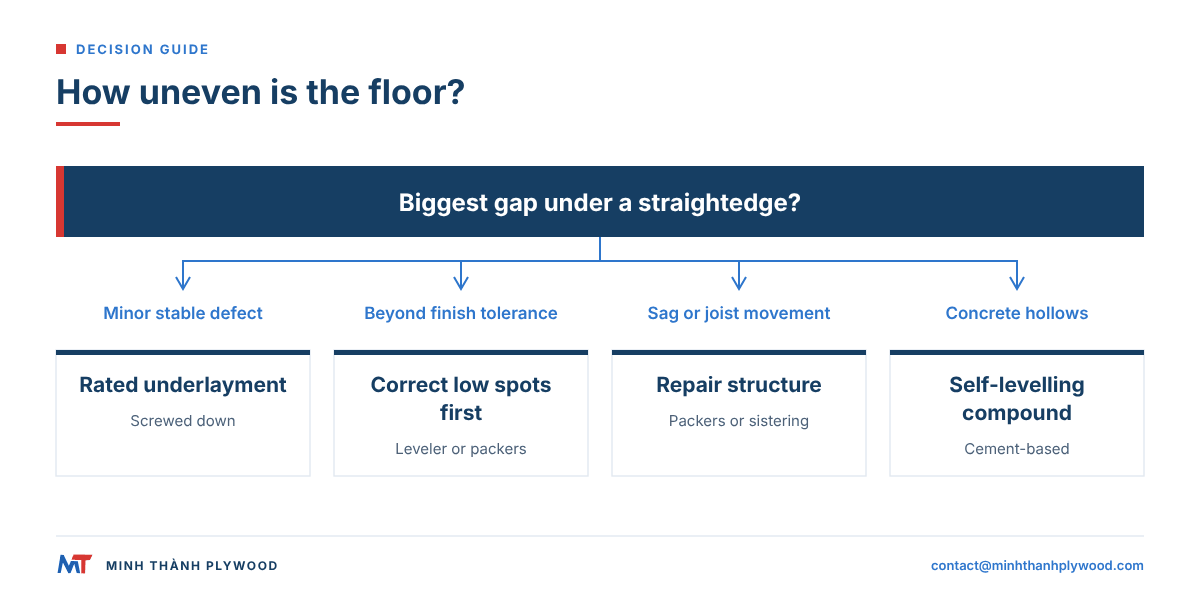
Measure the unevenness first, then choose the method. Lay a long straightedge or a straight timber across the floor in several directions and measure the biggest gap under it with feeler gauges or a ruler; check the overall slope with a spirit or laser level.
| What you measure | Method | Why |
|---|---|---|
| Minor sound board-edge defects, with flatness within finish tolerance | Rated plywood underlayment | Smooths the surface, not the structure |
| Local dips outside the finish maker’s tolerance | Compatible patch/leveler or correction of support, then overlay | A thin sheet follows a dip |
| Overall slope, sag or joist movement | Investigate and repair/level the structure | Surface plywood does not remove the cause |
| Concrete with hollows | Cement-based self-levelling compound | Flows into hollows; plywood would rock |
| Springy, rotten or broken joists | Repair the structure first | No overlay fixes a weak floor |
A useful rule: plywood levels the surface, packers and joists level the structure, and compound fills hollows. Most old timber floors need a little of each.
How to level a floor with plywood, step by step
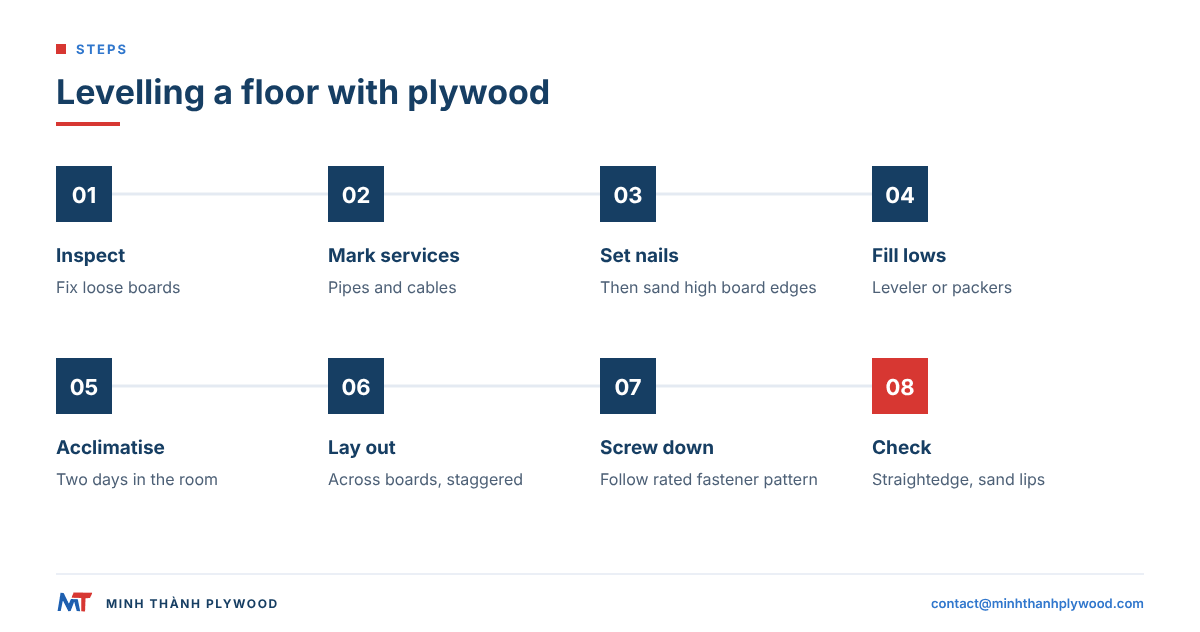
To level a floor with plywood over sound floorboards, fix loose boards, mark services, remove high spots and correct low areas before laying the overlay. Acclimatise the sheets, stagger the joints and fix them securely. Check the finished surface against the floor covering manufacturer’s flatness requirements.
- Clear and inspect. Lift the old covering, check every board, and screw down loose boards into the joists. Replace any that are split or rotten.
- Find the services. Mark pipe and cable runs on the boards so no screw goes through them.
- Plane or sand the high spots. Punch nail heads below the surface first, then plane or sand proud board edges.
- Fill or pack the low spots. Fill dips of a few millimetres with a floor leveler made for wood, or lift boards and pack the joists for deeper ones.
- Acclimatise the plywood. Leave the sheets flat in the room for at least two days.
- Lay out the sheets. Run the long side across the boards, start from the straightest wall, stagger end joints and keep sheet joints off board joints.
- Fasten to the selected system. After marking pipes and cables, choose nail/screw type, length, spacing and joint treatment from the rated underlayment and floor-covering instructions. APA resilient underlayment shows 1/32 in butt-joint gaps; other structural panel systems may differ.
- Check and finish. Check with the straightedge, sand any lipping at joints, fill screw heads if the finish needs it, and vacuum before the floor covering goes down.
Our guide on how to install a plywood subfloor covers the same steps for a new floor on joists.
How to level a subfloor with plywood: packers, shims and sistering
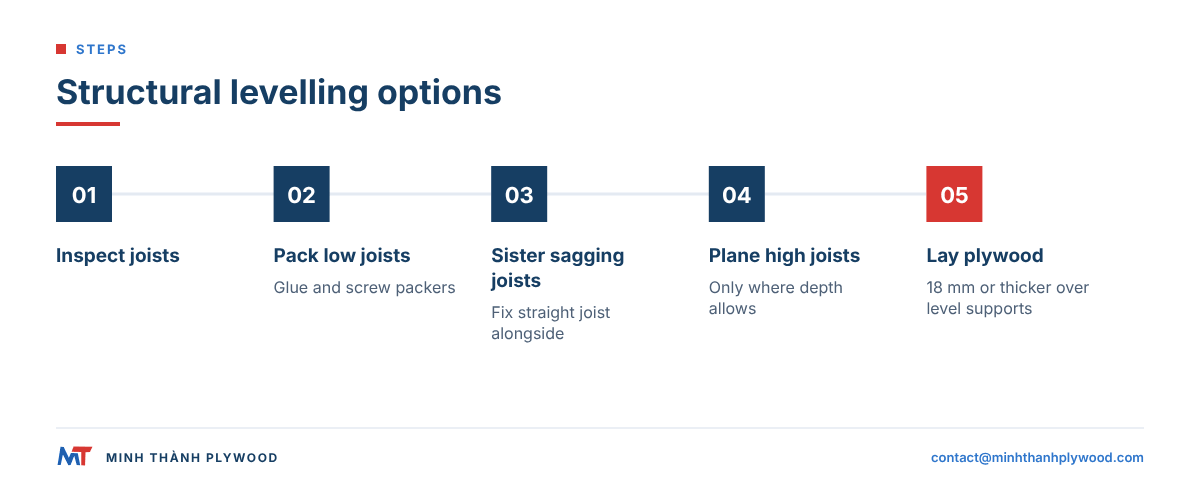
How to level a subfloor with plywood when the joists are out of level: correct the joists or battens first, then lay the plywood. The overlay or new subfloor sheet then sits on a flat plane.
Three ways to correct the structure:
- Packers and shims. Lift the old boards and fix tapered timber packers or plastic shims on the low joists until a string line or laser shows them level. Glue and screw packers so they cannot creep.
- Sistering. Fix a new, straight joist alongside a sagging one, set level and bolted or screwed through. This both levels and stiffens.
- Planing. Plane the tops of high joists down, where the joist depth allows it.
On a concrete or solid base, the same job is done with treated battens laid on packers. Once the joists or battens are in one plane, an 18 mm or thicker subfloor sheet spans them; our guide to subfloor plywood thickness gives the sheet by joist spacing.
What thickness plywood over floorboards?
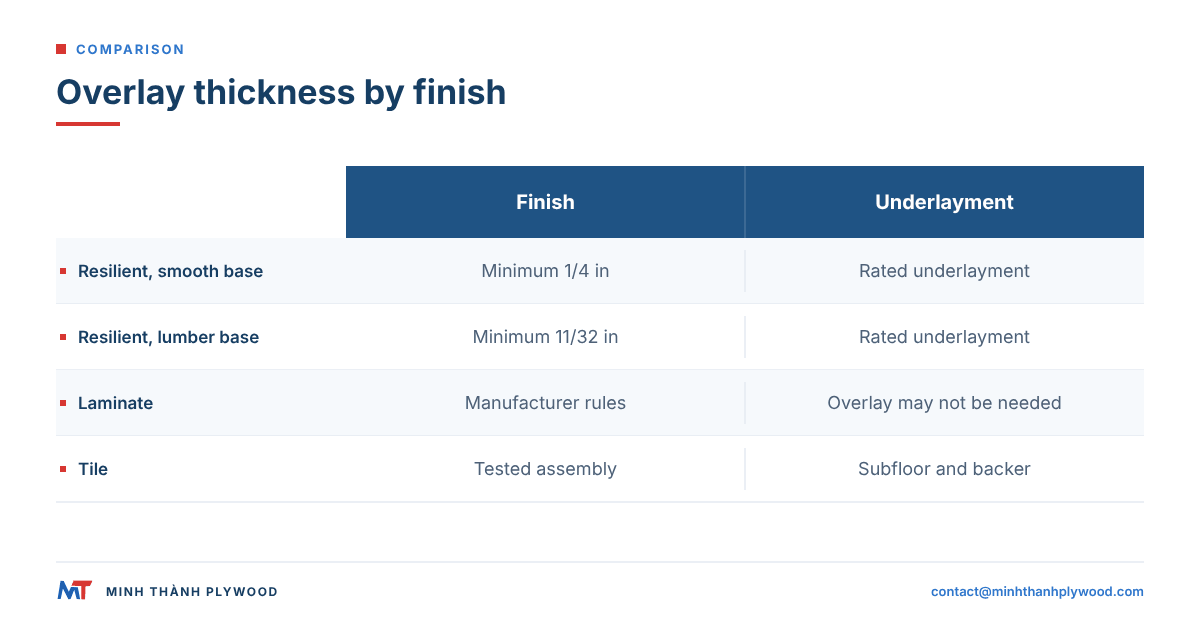
The plywood thickness depends on the subfloor, intended finish, underlayment grade and approved floor assembly. APA E30X separates resilient-finish underlayment from TCNA ceramic-tile floor systems in separate tables; see the APA plywood underlayment guide.
| Floor finish | Plywood over floorboards | Why |
|---|---|---|
| Resilient flooring over an otherwise smooth subfloor | APA Table 17: minimum 1/4 in (about 6 mm) rated underlayment | Grade, sanded face and fasteners matter |
| Resilient flooring over lumber/uneven subfloor | APA Table 17: minimum 11/32 in (about 9 mm) rated underlayment, after repairing loose boards | Thick plywood alone does not cure sag |
| Laminate or engineered wood | Check the flooring manufacturer’s flatness and underlayment rules | A second plywood sheet layer is not always needed |
| Ceramic or stone tile | Choose a tested TCNA/APA subfloor plus backer/uncoupling assembly | Support spacing, deflection and waterproofing govern; not a blanket 15 mm layer |
Every millimetre raises the floor: check door clearances, thresholds and the step to the next room before choosing thicker sheets. Our thin plywood at 3–5 mm is always 5-ply; the ply count for 6 mm panels is set per order.
How to lay plywood over floorboards and fix it
Lay approved plywood underlayment over stable boards with staggered joints and the rated fastening schedule. APA E30X Table 17 distinguishes smooth versus lumber/uneven substrates and lists ring- or screw-shank nails; it does not establish a universal screw grid for all plywood products.
| Item | Practice |
|---|---|
| Sheet direction | Long side across the floorboards |
| Joints | Staggered, never on a board joint, never four corners meeting |
| APA-rated underlayment fasteners | APA E30X Table 17: over smooth base, 3 in edges/6 in field; over lumber or uneven base, 6 in edges/8 in field, with special allowance for eligible thicker/five-ply panels |
| Screws where approved | Follow the underlayment/finish manufacturer’s specific screw length and grid; the APA example above specifies nails |
| Butt joints in resilient underlayment | APA illustrates 1/32 in; other subfloor/finish systems may specify different gaps |
| Gap at walls | About 10 mm (3/8 in), hidden by skirting |
| Glue | Not usually over old boards, so the overlay can be lifted |
APA calls for approved ring- or screw-shank nails for its underlayment; flush heads, offsets and proper joint finishing matter more than a generic statement that one fastener always works best. An approved screw assembly may differ. See APA underlayment installation guidance and check for pipes and cables before fixing.
Floor leveler for plywood: when should you use compound?
Use a floor leveler for plywood when the dips are too deep for the sheet to bridge but too shallow to pack, or when the finish needs a flatter surface than the plywood alone gives. The compound must be one made for timber subfloors: flexible, often fibre-reinforced, and applied over a primer.
Product-specific example: ARDEX Liquid BackerBoard is designed for specified interior wood subfloors and explicitly does not require metal lath. Other products have different requirements; verify the exact datasheet rather than applying this table to every cement compound:
| Item | Typical requirement |
|---|---|
| Example wood subfloor | ARDEX data requires a suitably supported rigid wood substrate; check the approved plywood/wood type and minimum thickness in the product data |
| Stiffness | Verify deflection, floor covering load, joist support and the compound’s approved substrate requirements |
| Weak floor | Correct joists or existing plywood before pouring; a thicker overlay is not a universal remedy |
| Reinforcement | Follow the chosen primer/lath system; ARDEX Liquid BackerBoard does not require metal lath |
| Pour depth | Product-specific; ARDEX product page lists up to 1 1/4 in (32 mm), other compounds differ |
| Strength | Do not assume a generic psi figure: ARDEX product data states 3,000 psi at 28 days under ASTM C109/mod |
How to use it on wood:
- Confirm that the existing structure and plywood meet the chosen compound and floor-covering system’s stiffness requirements; fix loose and flexing areas before pouring. Do not extrapolate a deflection limit from a single joist-span example.
- Seal the joints and gaps so the compound does not run into the void below.
- Prime the plywood to the compound maker’s instructions, and fix lath or fibre reinforcement if the maker asks for it.
- Mix and pour at the depth the maker allows, feathering into the high areas.
- Let it cure for the stated time before laying the floor covering; check the flatness target below before the finish goes on.
A cement compound made only for concrete is the wrong product on wood; it does not tolerate the small movement of a timber floor. For slopes larger than the compound’s depth limit, correct the structure instead.
What flatness do flooring makers ask for?
Flooring makers state flatness as a gap under a straightedge. For wood flooring, the National Wood Flooring Association asks for a subfloor flat to 3/16 in in 10 ft (about 5 mm) or 1/8 in in 6 ft (about 3 mm) for glue-down and short-fastener nail-down. Nail-down with fasteners of 1.5 in or longer allows 1/4 in in 10 ft or 3/16 in in 6 ft. Tile and resilient flooring makers set their own figures, so read the data sheet before the sheets go down.
Plywood overlay sheets with a tolerance of ±0.5 mm limit thickness variation, but adjoining sheets still need to be checked for lipping.
How to level a concrete floor with plywood
To level a concrete floor with plywood, fix a damp-proof membrane first, then lay treated battens on packers until they are level, and fix plywood on top. For small dips on an otherwise flat slab, a floating plywood floor on a levelling underlay works; deep hollows are better filled with a cement-based self-levelling compound. In England, Approved Document C is the building-regulation guidance on site preparation and resistance to moisture.
Concrete brings moisture from below, so the order matters:
- Membrane: polythene or a liquid damp-proof membrane over the slab, lapped up the walls.
- Battens: treated timber, packed level with plastic shims, fixed to the slab.
- Plywood: exterior-grade sheets with a water-resistant bond, screwed to the battens with joints on a batten.
- Ventilation: leave the batten void ventilated or filled with insulation as the design needs.
Our guide to plywood subfloors over concrete covers basements and the moisture checks in full.
How to level a bathroom floor with plywood
To level a bathroom floor with plywood, repair and level the joists or boards first. Choose the thickness, backer or uncoupling layer, waterproof membrane and fixing pattern as one approved wet-room system; a blanket 15 mm overlay does not establish stiffness or waterproofing. The US EPA advises drying water-damaged areas and items within 24-48 hours to prevent mold growth.
Bathrooms add two loads to the job: tile, which needs a stiff base, and water, which finds every open edge.
- Bond: melamine-fortified or phenolic WBP plywood, not interior UF-bonded sheets.
- Stiffness: a thicker overlay, screwed at close centres, so the floor does not flex under the bath or shower tray.
- Sealing: seal all cut edges and joints before the membrane goes on.
- Membrane or backer: a tanking membrane or cement backer board between plywood and tile.
Our guide to bathroom subfloors covers wet-room build-ups.
Levelling a plywood floor for laminate, vinyl or tile
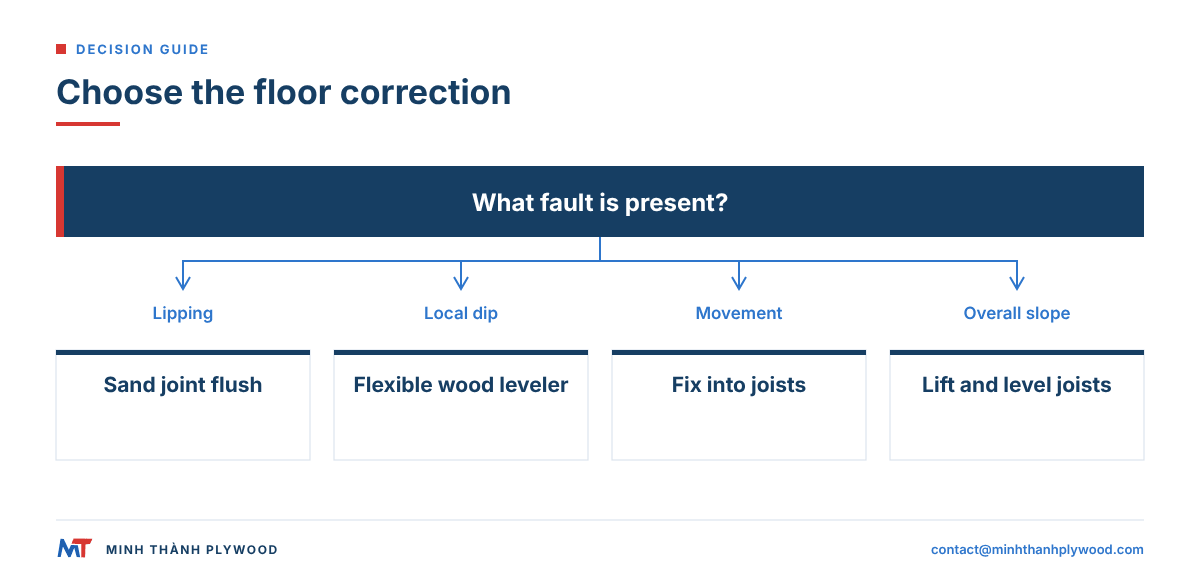
Levelling a plywood floor that is already down follows the same rule: find the fault, correct it at its cause, then smooth the surface for the finish.
| Fault on a plywood floor | Fix |
|---|---|
| Lipping at sheet joints | Sand flush; check the joint sits on a joist or batten |
| Squeaks and movement | Add screws into the joists; glue loose sheets |
| Local dip | Feather in a flexible floor leveler for wood |
| Hump over a joist | Plane the sheet if thick enough, or lift and plane the joist |
| Overall slope | Lift, pack joists level, re-lay |
Laminate on its underlay tolerates small undulations but not steps; sheet vinyl and LVT show every bump and need the flattest surface; tile needs both flatness and stiffness. Check the flooring maker’s flatness tolerance before you start and measure against it.
Why does calibrated plywood thickness matter for a level floor?
A level floor needs every sheet to be the same thickness, because two neighbouring sheets of different thickness leave a step at the joint. Under vinyl or LVT that step shows through as a line; under tile it can crack the grout.
Our panels are pressed to known tolerances (quality and certificates): commercial and exterior panels to ±0.5 mm, sanded furniture panels to ±0.2–0.3 mm and down to ±0.2 mm, with ±2 mm on length and width. Furniture-grade panels are pressed twice, the core first and calibrated, then the faces, so the thickness is set before the face goes on.
On site, measure a few sheets with a caliper before laying and sort out-of-tolerance panels. The factory length/width tolerance is not a suitable substitute for checking joint and perimeter gaps, which must follow the specified subfloor and finish installation instructions.
Which plywood for levelling a floor?
Choose a grade approved for the actual floor covering and underlayment duty, not just a water-resistant glue line. APA cautions that ordinary C-D Plugged is not a substitute for rated plywood underlayment under resilient finishes because face and inner-ply dent resistance differ. An exterior/CDX-type substrate is not automatically a certified APA Underlayment or a tile-ready assembly; see APA underlayment selection guidance. Under the US standard PS 1-22, underlayment is plywood produced with touch-sanded or sanded faces.
What we supply for floor levelling and subfloor work:
| Order item | Minh Thanh practice |
|---|---|
| Panel | Exterior / CDX-type substrate where approved by the floor system; specify rated smooth underlayment for direct resilient finishes |
| Bond | Melamine-fortified (12-hour boiling requirement) or phenolic WBP |
| Thickness | 3–40 mm; thin 3–5 mm sheets always 5-ply |
| Tolerance | ±0.5 mm on exterior panels; ±2 mm on length and width |
| Sizes | 1220 × 2440 and 1250 × 2500 mm, plus 1220 × 2500 and 1220 × 2280 mm |
| MOQ and lead time | One 40HC; production 15–45 days after deposit |
| Samples | Free samples |
Our exterior plywood page lists bonds and faces, not an APA underlayment certification. Obtain the floor finish manufacturer’s substrate approval and assembly instructions before selecting a sheet for installation.
What mistakes should you avoid when levelling a floor with plywood?
The common mistakes are laying plywood over a floor that is sloping or weak, and fixing it too loosely. Avoid these:
- Overlaying a sag. Plywood follows the floor; correct the joists first.
- Wrong fastener schedule. A generic wide nail or screw grid can leave movement under the selected underlayment grade.
- Wrong gaps. Joint separation and filling depend on the subfloor/underlayment and finish system, not one figure for all panels.
- Joints on board joints. The overlay then moves with the boards beneath.
- Interior-bonded plywood in wet rooms. Use a water-resistant bond.
- Screwing into services. Mark pipes and cables first.
- Skipping acclimatisation. Sheets laid straight from a cold store move later.
To quote plywood for a floor levelling or subfloor project, send the thickness, bond, sheet size, quantity and destination port through the exterior plywood page. We reply within hours.
Buyer questions, answered
Can you level a floor with plywood?
Yes, when the floor is structurally sound and the unevenness is small. A screwed plywood overlay bridges gaps and small humps between boards; it follows a large dip or slope, so those need packers, sistered joists or a levelling compound first.
What thickness plywood over floorboards?
Select underlayment by the existing base and finish. APA Table 17 lists 1/4 in for suitable smooth subfloors and 11/32 in over lumber or uneven surfaces, subject to grade and fastening; ceramic and stone tile need an approved TCNA/APA system rather than a universal 15 mm overlay.
How do you fix plywood to floorboards?
Use the underlayment maker's fastener and gap schedule, not a universal 150/300 mm screw pattern. APA Table 17 lists different ring- or screw-shank nail schedules by substrate, and APA resilient underlayment shows 1/32 in butt-joint spacing before prescribed finishing.
How do you level a plywood floor for laminate?
Sand down high joints, fill dips with a flexible floor leveler made for wood subfloors, and check with a long straightedge. Laminate tolerates small undulations on its underlay but not steps or humps.
Can you put self-levelling compound on a plywood floor?
Yes, if the compound is made for timber subfloors, the plywood is rigid and screwed down, and it is primed to the compound maker's instructions. Use a flexible, fibre-reinforced product and the depth the maker allows.
How do you level a concrete floor with plywood?
Lay a damp-proof membrane, then fix treated battens packed level and lay plywood on top, or float plywood over a levelling underlay for small dips. Deep hollows in concrete are better filled with a cement-based levelling compound.
How do you level a bathroom floor with plywood?
First level and stiffen the structural floor. Choose the plywood subfloor, approved backer or uncoupling layer, waterproof membrane, fixings and edge details together for the specified wet-room tile system, rather than using 15 mm plywood alone as a guarantee.
Should plywood be glued to floorboards?
Screws alone are usual over old floorboards, so the overlay can be lifted later to reach pipes and cables. On a new subfloor, glue and screws together make a stiffer, quieter floor.
Which way should plywood run over floorboards?
Run the long side of each sheet across the floorboards and stagger the end joints, so no sheet joint lines up with a board joint.
Do I need to acclimatise plywood before laying it?
Yes. Leave the sheets flat in the room for at least two days before fixing, so they reach the room's humidity and do not move after the floor finish goes down.